10 KiB
Using pipelines
Pipelines are a feature which offers layers of functionality on top of the default socket implementation behaviour. In the case of the UDP socket this makes it possible to have additional functionality on top of the standard unreliable datagram, such as Quality of Service features like sequencing, reliability, fragmentation and so on. This could work with any type of socket interface which has been implemented for use in the driver.
How it works
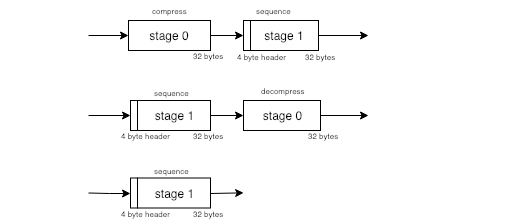
The way it works is that you can add any number of pipeline stages to your transport driver. So when you send a packet it will go to the first stage, then the next and so on until it's sent on the wire. On the receiving side the stages are then processed in reverse order, so the packet is correctly "unpacked" by the stages.
For example the first stage might compress a packet and a second stage could add a sequence number (just the packets header). When receiving the packet is first passed through the sequence stage and then decompressed. The sequence stage could drop the packet if it's out of order in which case it leaves the pipeline and doesn't continue to the decompression.
The pipeline stages are gathered together in a collection. This is the interface between the pipeline processor in the driver to the pipeline stages you might be using. Here the pipeline stages are initialized and so on. There is a default collection provided in the driver which has all the built in pipeline stages already configured. It's possible to just use that and use a custom collection if you have your own pipeline stage you need to add to the collection.
Example usage
The example below shows how the driver can create a new pipeline with 2 pipeline stages present (sequencer and simulator). The driver is created with the default pipeline collection and the pipeline parameters can be passed to the collection there. Multiple pipeline parameters can be passed in this way and the collection itself takes care of assigning them to the right pipeline stage.
When sending packets the pipeline can then be specified as a parameter, so the packet is passed through it, it's then automatically processed the right way on the receiving end. It's therefore important both the client and server set up their pipelines in exactly the same way. One exception is with pipeline stages which do not manipulate the packet payload or header, these do not need to be symmetric. For example the simulator stage here is only keeping packets on hold for a certain time and then releases them unmodified or drops them altogether, it can therefore be set up to only run on the client.
using Unity.Collections;
using Unity.Networking.Transport;
using Unity.Networking.Transport.Utilities;

public class Client
{
    NetworkDriver m_DriverHandle;
    NetworkPipeline m_Pipeline;

    const int k_PacketSize = 256;

    // Connection establishment omitted
    public NetworkConnection m_ConnectionToServer;

    public void Configure()
    {
        // Driver can be used as normal
        m_DriverHandle = NetworkDriver.Create(new SimulatorUtility.Parameters {MaxPacketSize = k_PacketSize, MaxPacketCount = 30, PacketDelayMs = 100});
        // Driver now knows about this pipeline and can explicitly be asked to send packets through it (by default it sends directly)
        m_Pipeline = m_DriverHandle.CreatePipeline(typeof(UnreliableSequencedPipelineStage), typeof(SimulatorPipelineStage));
    }

    public void SendMessage(NativeArray<byte> someData)
    {
        // Send using the pipeline created in Configure()
        var writer = m_DriverHandle.BeginSend(m_Pipeline, m_ConnectionToServer);
        writer.WriteBytes(someData);
        m_DriverHandle.EndSend(writer);
    }
}
Simulator Pipeline
The simulator pipeline stage could be added on either the client or server to simulate bad network conditions. It's best to add it as the last stage in the pipeline, then it will either drop the packet or add a delay right before it would go on the wire.
Using the simulator
Nothing needs to be done after configuring the pipline, it can be set up like this when the driver is created:
m_DriverHandle = NetworkDriver.Create(new SimulatorUtility.Parameters {MaxPacketSize = NetworkParameterConstants.MTU, MaxPacketCount = 30, PacketDelayMs = 25, PacketDropPercentage = 10});
m_Pipeline = m_DriverHandle.CreatePipeline(typeof(SimulatorPipelineStage));
This would create a simulator pipeline stage which can delay up to 30 packets of a size up to the MTU size constant. Each packets gets a 25 ms delay applied and 10% of packets received will be dropped. SimulatorPipelineStage processes packets on the Receive stage of the pipeline.
Debug information
To get information about internal state in the simulator you can check the SimulatorUtility.Context structure, stored in the pipeline stage shared buffer. This tracks how many packets have been set, PacketCount, and how many of those were dropped, PacketDropCount. ReadyPackets and WaitingPackets shows what packets are now ready to be sent (delay time expired) and how many are stored by the simulator. StatsTime and NextPacketTime show the last time the simulator ran and when the next packet is due to be released.
public unsafe void DumpSimulatorStatistics()
{
    var simulatorStageId = NetworkPipelineStageCollection.GetStageId(typeof(SimulatorPipelineStage));
    driver.GetPipelineBuffers(pipeline, simulatorStageId, connection[0], out var receiveBuffer, out var sendBuffer, out var sharedBuffer);
    var simCtx = (SimulatorUtility.Context*)sharedBuffer.GetUnsafeReadOnlyPtr();
    UnityEngine.Debug.Log("Simulator stats\n" +
        "PacketCount: " + simCtx->PacketCount + "\n" +
        "PacketDropCount: " + simCtx->PacketDropCount + "\n" +
        "ReadyPackets: " + simCtx->ReadyPackets + "\n" +
        "WaitingPackets: " + simCtx->WaitingPackets + "\n" +
        "NextPacketTime: " + simCtx->NextPacketTime + "\n" +
        "StatsTime: " + simCtx->StatsTime);
}
Reliability pipeline
The reliability pipeline makes sure all packets are delivered and in order. It adds header information to all packets sent and tracks their state internally to make this happen. Whenever a packet is sent, it is given a sequence ID and then stored in the send processing buffer along with timing information (send time). The packet is then sent with that sequence ID added to the packet header. All packet headers also include information about what remote sequence IDs have been seen, so the receiver of the packet can know the delivery state of the packets it sent. This way there is always information about delivery state flowing between the two endpoints who make up a connection. If a certain time interval expires without an acknowledgement for a particular sequence ID the packet is resent and the timers reset.
Reliability packet header looks like this:
public struct PacketHeader
{
    public ushort Type;
    public ushort ProcessingTime;
    public ushort SequenceId;
    public ushort AckedSequenceId;
    public uint AckMask;
}
Where the type could be either a payload or ack packet, which is an empty packet with only this header. Processing time is time which passed between receiving a particular sequence ID and sending an acknowledgement for it, this is used for Round Trip Time (RTT) calculations. Then there is the sequence ID of this packet (not used in ack packets) and what remote sequence ID is being acknowledged. The AckMask is the history of acknowledgements we know about (up to the window size) so you can acknowledge multiple packets in a single header.
The ack packet type is used when a certain amount of time has passed and nothing has been sent to the remote endpoint. We then check if we need to send a pending acknowledgement to him, or else the last packet will be assumed lost and a resend will take place. If a message is sent on every update call these kinds of packets never need to be sent.
Using the reliability pipeline
m_ServerDriver = NetworkDriver.Create(new ReliableUtility.Parameters { WindowSize = 32 });
m_Pipeline = m_ServerDriver.CreatePipeline(typeof(ReliableSequencedPipelineStage));
This would create a pipeline with just the reliability pipeline stage present, and initialize it to a window size of 32 (so it can keep track of 32 reliable packets at a one time). The maximum value for this is 32.
Because only 32 packets can be tracked at a time there can't be more than 32 packets in flight at any one time, trying to send a 33rd packet will result in an error and it will not be reliable (no guarantee of delivery). It's possible to check for such errors by checking the error code in the reliability internal state:
// Get a reference to the internal state or shared context of the reliability
var reliableStageId = NetworkPipelineStageCollection.GetStageId(typeof(ReliableSequencedPipelineStage));
m_ServerDriver.GetPipelineBuffers(serverPipe, reliableStageId, serverToClient, out var tmpReceiveBuffer, out var tmpSendBuffer, out var serverReliableBuffer);
var serverReliableCtx = (ReliableUtility.SharedContext*) serverReliableBuffer.GetUnsafePtr();

var strm = m_ServerDriver.BeginSend(serverPipe, serverToClient);
m_ServerDriver.EndSend(strm);
if (serverReliableCtx->errorCode != 0)
{
    // Failed to send with reliability, error code will be ReliableUtility.ErrorCodes.OutgoingQueueIsFull if no buffer space is left to store the packet
}
It's possible to run into the OutgoingQueueIsFull error when packets are being sent too frequently for the latency and quality of the connection. High packet loss means packets need to stay for multiple RTTs in the queue and if the RTT is high then that time can end up being longer than the send rate + window size permit. For example with 60 packets sent per second a packet will go out every 16 ms, if the RTT is 250 ms about 16 packets will be in the queue at any one time. With a packet drop the total time will go up to 500 ms and the packet will be in the last slot when it's finally freed.
It best suited to use the reliability pipeline for event type messages (door opened), Remote Procedure Calls (RPCs) or slow frequency messages like chat.
Debug information
More internal state information can be gathered using GetPipelineBuffers as shown above. The soaker test gathers a lot of statistics as seen in the SoakCommon.cs file, in the GatherReliabilityStats function. There it checks what the RTT used internally is determined to be and how many packets have been sent, received, dropped, duplicated and resent.