12 KiB
Lit Shader
The Lit Shader lets you render real-world surfaces like stone, wood, glass, plastic, and metals in photo-realistic quality. Your light levels and reflections look lifelike and react properly across various lighting conditions, for example bright sunlight, or a dark cave. This Shader uses the most computationally heavy shading model in UniversalRP.
Using the Lit Shader in the Editor
To select and use this Shader:
- In your Project, create or find the Material you want to use the Shader on. Select the Material. A Material Inspector window opens.
- Click Shader, and select Universal Render Pipeline > Lit.
UI overview
The Inspector window for this Shader contains these elements:
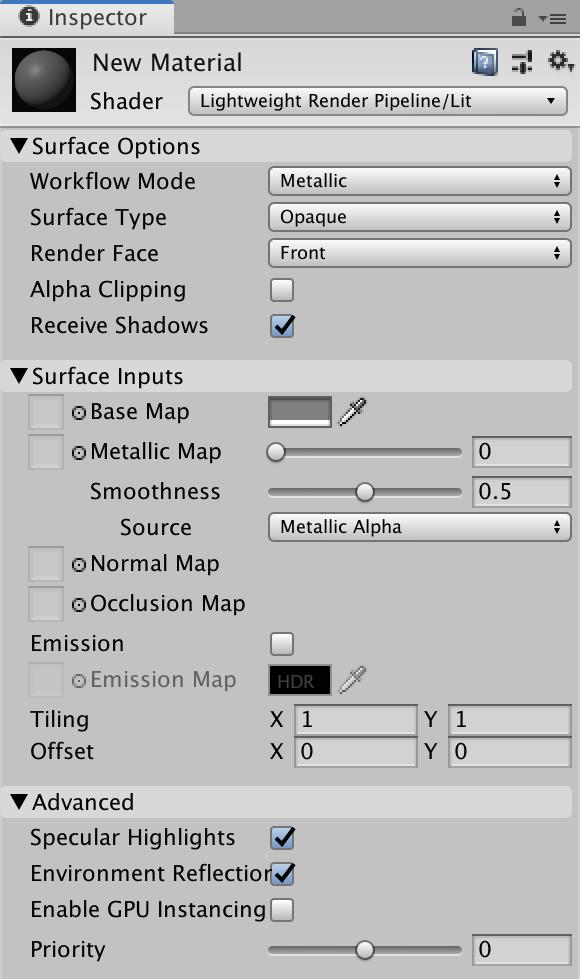
Surface Options
The Surface Options control how UniversalRP renders the Material on a screen.
| Property | Description |
|---|---|
| Workflow Mode | Use this drop-down menu to choose a workflow that fits your Textures, either Metallic and Specular. When you have made your choice, the main Texture options in the rest of the Inspector now follow your chosen workflow. For information on metallic or specular workflows, see this Manual page for the Standard built-in Shader in Unity. |
| Surface Type | Use this drop-down to apply an Opaque or Transparent surface type to the Material. This determines which render pass UniversalRP renders the material in. Opaque surface types are always fully visible, regardless of what’s behind them. UniversalRP renders opaque Materials first. Transparent surface types are affected by their background, and they can vary according to which type of transparent surface type you choose. UniversalRP renders transparent Materials in a separate pass after opaque objects. If you select Transparent, the Blending Mode drop-down appears. |
| Blending Mode | Use this drop-down to determine how UniversalRP calculates the color of each pixel of the transparent Material by blending the Material with the background pixels. Alpha uses the Material’s alpha value to change how transparent an object is. 0 is fully transparent. 1 appears fully opaque, but the Material is still rendered during the Transparent render pass. This is useful for visuals that you want to be fully visible but to also fade over time, like clouds. Premultiply applies a similar effect to the Material as Alpha, but preserves reflections and highlights, even when your surface is transparent. This means that only the reflected light is visible. For example, imagine transparent glass. Additive adds an extra layer to the Material, on top of another surface. This is good for holograms. Multiply multiplies the color of the Material with the color behind the surface. This creates a darker effect, like when you look through colored glass. |
| Render Face | Use this drop-down to determine which sides of your geometry to render. Front Face renders the front face of your geometry and culls the back face. This is the default setting. Back Face renders the front face of your geometry and culls the front face. Both makes UniversalRP render both faces of the geometry. This is good for small, flat objects, like leaves, where you might want both sides visible. |
| Alpha Clipping | Makes your Material act like a Cutout Shader. Use this to create a transparent effect with hard edges between the opaque and transparent areas. For example, to create blades of grass. To achieve this effect, UniversalRP does not render alpha values below the specified Threshold, which appears when you enable Alpha Clipping. You can set the Threshold by moving the slider, which accepts values from 0 to 1. All values above your threshold are fully opaque, and all values below your threshold are invisible. For example, a threshold of 0.1 means that UniversalRP doesn't render alpha values below 0.1. The default value is 0.5. |
| Receive Shadows | Tick this box to enable your GameObject to have shadows cast upon it by other objects. If you untick this box, the GameObject will not have shadows on it. |
Surface Inputs
The Surface Inputs describe the surface itself. For example, you can use these properties to make your surface look wet, dry, rough, or smooth.
Note: If you are used to the Standard Shader in the built-in Unity render pipeline, these options are similar to the Main Maps settings in the Material Editor.
| Property | Description |
|---|---|
| Base Map | Adds color to the surface, also known as the diffuse map. To assign a Texture to the Base Map setting, click the object picker next to it. This opens the Asset Browser, where you can select from the Textures in your Project. Alternatively, you can use the color picker. The color next to the setting shows the tint on top of your assigned Texture. To assign another tint, you can click this color swatch. If you select Transparent or Alpha Clipping under Surface Options, your Material uses the Texture’s alpha channel or color. |
| Metallic / Specular Map | Shows a map input for your chosen Workflow Mode in the Surface Options. For the Metallic Map workflow, the map gets the color from the Base Map assigned above. Use the slider to control how metallic the surface appears. 1 is fully metallic, like silver or copper, and 0 is fully dielectric, like plastic or wood. You can generally use values in between 0 and 1 for dirty or corroded metals. For the Specular Map setting, you can assign a texture to it by clicking the object picker next to it. This opens the Asset Browser, where you can select from the Textures in your Project. Alternatively, you can use the color picker. For both workflows, you can use the Smoothness slider to control the spread of highlights on the surface. 0 gives a wide, rough highlight. 1 gives a small, sharp highlight like glass. Values in between produce semi-glossy looks. For example, 0.5 produces a plastic-like glossiness. Under Source, you can control where to sample a smoothness map from.y default, both the metallic and specular workflow uses the Alpha channel of its map for the source. You can also set it to the Base Map Alpha channel. |
| Normal Map | Adds a normal map to the surface. With a normal map, you can add surface details like bumps, scratches and grooves. To add the map, click the object picker next to it. The normal map picks up ambient lighting in the environment. The float value next to the setting is a multiplier for the effect of the Normal Map. Low values decrease the effect of the normal map. High values create stronger effects. |
| Occlusion Map | Select an occlusion map. This simulates shadows from ambient light and reflection, which makes lighting look more realistic as less light reaches corners and crevices of objects. To select the occlusion map, click the object picker next to it. |
| Emission | Makes the surface look like it emits lights. When enabled, the Emission Map and Emission Color settings appear. To assign an Emission Map, click the object picture next to it. This opens the Asset Browser, where you can select from the textures in your Project. For Emission Color, you can choose the color picker](https://docs.unity3d.com/Manual/EditingValueProperties.html) to assign a tint on top of the color. This can be more than 100% white, which is useful for effects like lava, that shines brighter than white while still being another color. If you have not assigned an Emission Map, the Emission setting only uses the tint you’ve assigned in Emission Color. If you do not enable Emission, UniversalRP sets the emission to black and does not calculate emission. |
| Tiling | A 2D multiplier value that scales the Texture to fit across a mesh according to the U and V axes. This is good for surfaces like floors and walls. The default value is 1, which means no scaling. Set a higher value to make the Texture repeat across your mesh. Set a lower value to stretch the Texture. Try different values until you reach your desired effect. |
| Offset | The 2D offset that positions the Texture on the mesh. To adjust the position on your mesh, move the Texture across the U or V axes. |
Advanced
The Advanced settings affect the underlying calculations of your rendering. They do not have a visible effect on your surface.
| Property | Description |
|---|---|
| Specular Highlights | Enable this to allow your Material to have specular highlights from direct lighting, for example Directional, Point, and Spot lights. This means that your Material reflects the shine from these light sources. Disable this to leave out these highlight calculations, so your Shader renders faster. By default, this feature is enabled. |
| Environment Reflections | Sample reflections using the nearest Reflection Probe, or, if you have set one in the Lighting window, the Lighting Probe. If you disable this, you will have fewer Shader calculations, but this also means that your surface has no reflections. |
| Enable GPU Instancing | Makes UniversalRP render meshes with the same geometry and Material in one batch, when possible. This makes rendering faster. UniversalRP cannot render Meshes in one batch if they have different Materials or if the hardware does not support GPU instancing. |
| Priority | Use this slider to determine the chronological rendering order for a Material. UniversalRP renders Materials with higher values first. You can use this to reduce overdraw on devices by making the pipeline render Materials in front of other Materials first, so it doesn't have to render overlapping areas twice. This works similarly to the render queue in the built-in Unity render pipeline. |
Channel packing
This Shader uses channel packing, so you can use a single RGBA texture for the metallic, smoothness and occlusion properties. When you use texture packing, you only have to load one texture into memory instead of three separate ones. When you write your texture maps in a program like Substance or Photoshop, you can pack the maps like this:
| Channel | Property |
|---|---|
| Red | Metallic |
| Green | Occlusion |
| Blue | None |
| Alpha | Smoothness |