14 KiB
Basic Guide
This guide will show you how to use a pre-trained model in an example Unity environment (3D Ball) and show you how to train the model yourself.
If you are not familiar with the Unity Engine, we highly recommend the Roll-a-ball tutorial to learn all the basic concepts of Unity.
Setting up the ML-Agents Toolkit within Unity
In order to use the ML-Agents toolkit within Unity, you first need to change a few Unity settings.
- Launch Unity
- On the Projects dialog, choose the Open option at the top of the window.
- Using the file dialog that opens, locate the
UnitySDKfolder within the ML-Agents toolkit project and click Open. - Go to Edit > Project Settings > Player
- For each of the platforms you target (PC, Mac and Linux Standalone,
iOS or Android):
- Expand the Other Settings section.
- Select Scripting Runtime Version to Experimental (.NET 4.6 Equivalent or .NET 4.x Equivalent)
- Go to File > Save Project
Running a Pre-trained Model
We include pre-trained models for our agents (.nn files) and we use the
Unity Inference Engine to run these models
inside Unity. In this section, we will use the pre-trained model for the
3D Ball example.
-
In the Project window, go to the
Assets/ML-Agents/Examples/3DBall/Scenesfolder and open the3DBallscene file. -
In the Project window, go to the
Assets/ML-Agents/Examples/3DBall/Prefabsfolder. ExpandGameand click on thePlatformprefab. You should see thePlatformprefab in the Inspector window.Note: The platforms in the
3DBallscene were created using thePlatformprefab. Instead of updating all 12 platforms individually, you can update thePlatformprefab instead.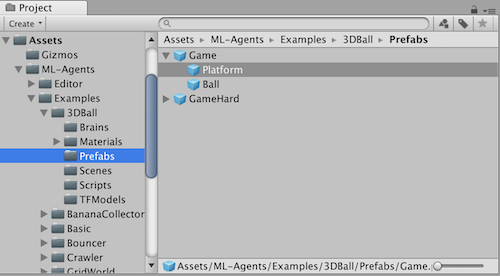
-
In the Project window, drag the 3DBallLearning Brain located in
Assets/ML-Agents/Examples/3DBall/Brainsinto theBrainproperty underBall 3D Agent (Script)component in the Inspector window.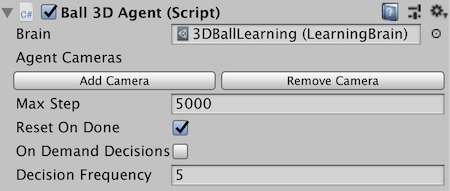
-
You should notice that each
Platformunder eachGamein the Hierarchy windows now contains 3DBallLearning asBrain. Note : You can modify multiple game objects in a scene by selecting them all at once using the search bar in the Scene Hierarchy. -
In the Project window, click on the 3DBallLearning Brain located in
Assets/ML-Agents/Examples/3DBall/Brains. You should see the properties in the Inspector window. -
In the Project window, open the
Assets/ML-Agents/Examples/3DBall/TFModelsfolder. -
Drag the
3DBallLearningmodel file from theAssets/ML-Agents/Examples/3DBall/TFModelsfolder to the Model field of the 3DBallLearning Brain in the Inspector window. Note : All of the brains should now have3DBallLearningas the TensorFlow model in theModelproperty -
Select the InferenceDevice to use for this model (CPU or GPU). Note: CPU is faster for the majority of ML-Agents toolkit generated models
-
Click the Play button and you will see the platforms balance the balls using the pre-trained model.
Using the Basics Jupyter Notebook
The notebooks/getting-started.ipynb Jupyter notebook
contains a simple walk-through of the functionality of the Python API. It can
also serve as a simple test that your environment is configured correctly.
Within Basics, be sure to set env_name to the name of the Unity executable
if you want to use an executable or to
None if you want to interact with the current scene in the Unity Editor.
Before building the environment or interacting with it in the editor, select Ball3DAcademy in the Hierarchy window of the Unity editor and make sure Control checkbox is checked under Ball 3D Academy component.
More information and documentation is provided in the Python API page.
Training the Brain with Reinforcement Learning
Setting up the environment for training
To set up the environment for training, you will need to specify which agents are contributing
to the training and which Brain is being trained. You can only perform training with
a Learning Brain.
-
Each platform agent needs an assigned
Learning Brain. In this example, each platform agent was created using a prefab. To update all of the brains in each platform agent at once, you only need to update the platform agent prefab. In the Project window, go to theAssets/ML-Agents/Examples/3DBall/Prefabsfolder. ExpandGameand click on thePlatformprefab. You should see thePlatformprefab in the Inspector window. In the Project window, drag the 3DBallLearning Brain located inAssets/ML-Agents/Examples/3DBall/Brainsinto theBrainproperty underBall 3D Agent (Script)component in the Inspector window.Note: The Unity prefab system will modify all instances of the agent properties in your scene. If the agent does not synchronize automatically with the prefab, you can hit the Revert button in the top of the Inspector window.
-
In the Hierarchy window, select
Ball3DAcademy. -
In the Project window, go to
Assets/ML-Agents/Examples/3DBall/Brainsfolder and drag the 3DBallLearning Brain to theBrainsproperty underBraodcast Hubin theBall3DAcademyobject in the Inspector window. In order to train, make sure theControlcheckbox is selected.Note: Assigning a Brain to an agent (dragging a Brain into the
Brainproperty of the agent) means that the Brain will be making decision for that agent. Whereas dragging a Brain into the Broadcast Hub means that the Brain will be exposed to the Python process. TheControlcheckbox means that in addition to being exposed to Python, the Brain will be controlled by the Python process (required for training).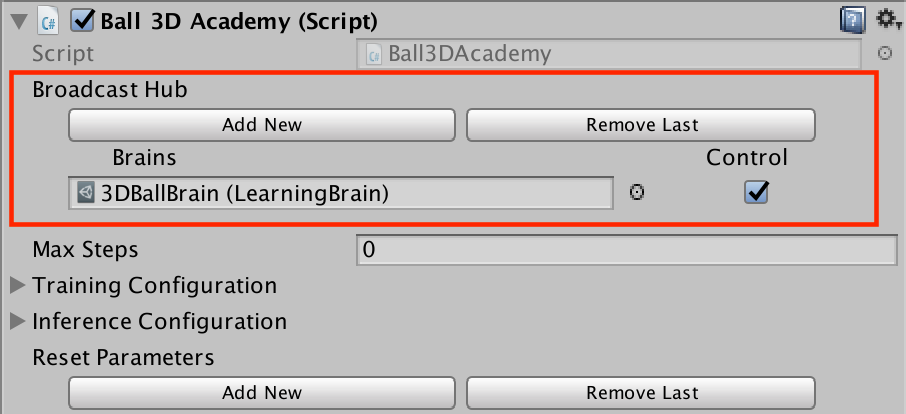
Training the environment
-
Open a command or terminal window.
-
Navigate to the folder where you cloned the ML-Agents toolkit repository. Note: If you followed the default installation, then you should be able to run
mlagents-learnfrom any directory. -
Run
mlagents-learn <trainer-config-path> --run-id=<run-identifier> --trainwhere:<trainer-config-path>is the relative or absolute filepath of the trainer configuration. The defaults used by example environments included inMLAgentsSDKcan be found inconfig/trainer_config.yaml.<run-identifier>is a string used to separate the results of different training runs--traintellsmlagents-learnto run a training session (rather than inference)
-
If you cloned the ML-Agents repo, then you can simply run
mlagents-learn config/trainer_config.yaml --run-id=firstRun --train -
When the message "Start training by pressing the Play button in the Unity Editor" is displayed on the screen, you can press the ▶️ button in Unity to start training in the Editor.
Note: Alternatively, you can use an executable rather than the Editor to perform training. Please refer to this page for instructions on how to build and use an executable.
ml-agents$ mlagents-learn config/trainer_config.yaml --run-id=first-run --train


                        ▄▄▄▓▓▓▓
                   ╓▓▓▓▓▓▓█▓▓▓▓▓
              ,▄▄▄m▀▀▀'  ,▓▓▓▀▓▓▄                           ▓▓▓  ▓▓▌
            ▄▓▓▓▀'      ▄▓▓▀  ▓▓▓      ▄▄     ▄▄ ,▄▄ ▄▄▄▄   ,▄▄ ▄▓▓▌▄ ▄▄▄    ,▄▄
          ▄▓▓▓▀        ▄▓▓▀   ▐▓▓▌     ▓▓▌   ▐▓▓ ▐▓▓▓▀▀▀▓▓▌ ▓▓▓ ▀▓▓▌▀ ^▓▓▌  ╒▓▓▌
        ▄▓▓▓▓▓▄▄▄▄▄▄▄▄▓▓▓      ▓▀      ▓▓▌   ▐▓▓ ▐▓▓    ▓▓▓ ▓▓▓  ▓▓▌   ▐▓▓▄ ▓▓▌
        ▀▓▓▓▓▀▀▀▀▀▀▀▀▀▀▓▓▄     ▓▓      ▓▓▌   ▐▓▓ ▐▓▓    ▓▓▓ ▓▓▓  ▓▓▌    ▐▓▓▐▓▓
          ^█▓▓▓        ▀▓▓▄   ▐▓▓▌     ▓▓▓▓▄▓▓▓▓ ▐▓▓    ▓▓▓ ▓▓▓  ▓▓▓▄    ▓▓▓▓`
            '▀▓▓▓▄      ^▓▓▓  ▓▓▓       └▀▀▀▀ ▀▀ ^▀▀    `▀▀ `▀▀   '▀▀    ▐▓▓▌
               ▀▀▀▀▓▄▄▄   ▓▓▓▓▓▓,                                      ▓▓▓▓▀
                   `▀█▓▓▓▓▓▓▓▓▓▌
                        ¬`▀▀▀█▓


INFO:mlagents.learn:{'--curriculum': 'None',
 '--docker-target-name': 'Empty',
 '--env': 'None',
 '--help': False,
 '--keep-checkpoints': '5',
 '--lesson': '0',
 '--load': False,
 '--no-graphics': False,
 '--num-runs': '1',
 '--run-id': 'first-run',
 '--save-freq': '50000',
 '--seed': '-1',
 '--slow': False,
 '--train': True,
 '--worker-id': '0',
 '<trainer-config-path>': 'config/trainer_config.yaml'}
INFO:mlagents.envs:Start training by pressing the Play button in the Unity Editor.
Note: If you're using Anaconda, don't forget to activate the ml-agents environment first.
If mlagents-learn runs correctly and starts training, you should see something
like this:
INFO:mlagents.envs:
'Ball3DAcademy' started successfully!
Unity Academy name: Ball3DAcademy
        Number of Brains: 1
        Number of Training Brains : 1
        Reset Parameters :

Unity brain name: 3DBallLearning
        Number of Visual Observations (per agent): 0
        Vector Observation space size (per agent): 8
        Number of stacked Vector Observation: 1
        Vector Action space type: continuous
        Vector Action space size (per agent): [2]
        Vector Action descriptions: ,
INFO:mlagents.envs:Hyperparameters for the PPO Trainer of brain 3DBallLearning:
        batch_size:          64
        beta:                0.001
        buffer_size:         12000
        epsilon:             0.2
        gamma:               0.995
        hidden_units:        128
        lambd:               0.99
        learning_rate:       0.0003
        max_steps:           5.0e4
        normalize:           True
        num_epoch:           3
        num_layers:          2
        time_horizon:        1000
        sequence_length:     64
        summary_freq:        1000
        use_recurrent:       False
        summary_path:        ./summaries/first-run-0
        memory_size:         256
        use_curiosity:       False
        curiosity_strength:  0.01
        curiosity_enc_size:  128
        model_path:	./models/first-run-0/3DBallLearning
INFO:mlagents.trainers: first-run-0: 3DBallLearning: Step: 1000. Mean Reward: 1.242. Std of Reward: 0.746. Training.
INFO:mlagents.trainers: first-run-0: 3DBallLearning: Step: 2000. Mean Reward: 1.319. Std of Reward: 0.693. Training.
INFO:mlagents.trainers: first-run-0: 3DBallLearning: Step: 3000. Mean Reward: 1.804. Std of Reward: 1.056. Training.
INFO:mlagents.trainers: first-run-0: 3DBallLearning: Step: 4000. Mean Reward: 2.151. Std of Reward: 1.432. Training.
INFO:mlagents.trainers: first-run-0: 3DBallLearning: Step: 5000. Mean Reward: 3.175. Std of Reward: 2.250. Training.
INFO:mlagents.trainers: first-run-0: 3DBallLearning: Step: 6000. Mean Reward: 4.898. Std of Reward: 4.019. Training.
INFO:mlagents.trainers: first-run-0: 3DBallLearning: Step: 7000. Mean Reward: 6.716. Std of Reward: 5.125. Training.
INFO:mlagents.trainers: first-run-0: 3DBallLearning: Step: 8000. Mean Reward: 12.124. Std of Reward: 11.929. Training.
INFO:mlagents.trainers: first-run-0: 3DBallLearning: Step: 9000. Mean Reward: 18.151. Std of Reward: 16.871. Training.
INFO:mlagents.trainers: first-run-0: 3DBallLearning: Step: 10000. Mean Reward: 27.284. Std of Reward: 28.667. Training.
After training
You can press Ctrl+C to stop the training, and your trained model will be at
models/<run-identifier>/<brain_name>.nn where
<brain_name> is the name of the Brain corresponding to the model.
(Note: There is a known bug on Windows that causes the saving of the model to
fail when you early terminate the training, it's recommended to wait until Step
has reached the max_steps parameter you set in trainer_config.yaml.) This file
corresponds to your model's latest checkpoint. You can now embed this trained
model into your Learning Brain by following the steps below, which is similar to
the steps described
above.
- Move your model file into
UnitySDK/Assets/ML-Agents/Examples/3DBall/TFModels/. - Open the Unity Editor, and select the 3DBall scene as described above.
- Select the 3DBallLearning Learning Brain from the Scene hierarchy.
- Drag the
<brain_name>.nnfile from the Project window of the Editor to the Model placeholder in the 3DBallLearning inspector window. - Select Ball3DAcademy in the scene and toggle off Control, each platform's brain now regains control.
- Press the ▶️ button at the top of the Editor.
Next Steps
- For more information on the ML-Agents toolkit, in addition to helpful background, check out the ML-Agents Toolkit Overview page.
- For a more detailed walk-through of our 3D Balance Ball environment, check out the Getting Started page.
- For a "Hello World" introduction to creating your own Learning Environment, check out the Making a New Learning Environment page.
- For a series of YouTube video tutorials, checkout the Machine Learning Agents PlayList page.