27 KiB
Agents
An agent is an actor that can observe its environment and decide on the best course of action using those observations. Create Agents in Unity by extending the Agent class. The most important aspects of creating agents that can successfully learn are the observations the agent collects for reinforcement learning and the reward you assign to estimate the value of the agent's current state toward accomplishing its tasks.
An Agent passes its observations to its Policy. The Policy, then, makes a decision and passes the chosen action back to the agent. Your agent code must execute the action, for example, move the agent in one direction or another. In order to train an agent using reinforcement learning, your agent must calculate a reward value at each action. The reward is used to discover the optimal decision-making policy.
The Policy class abstracts out the decision making logic from the Agent itself so
that you can use the same Policy in multiple Agents. How a Policy makes its
decisions depends on the kind of Policy it is. You can change the Policy of an
Agent by changing its Behavior Parameters. If you set Behavior Type to
Heuristic Only, the Agent will use its Heuristic() method to make decisions
which can allow you to control the Agent manually or write your own Policy. If
the Agent has a Model file, it Policy will use the neural network Model to
take decisions.
Decisions
The observation-decision-action-reward cycle repeats each time the Agent request
a decision.
Agents will request a decision when Agent.RequestDecision() is called. If you need
the Agent to request decisions on its own at regular intervals, add a
Decision Requester component to the Agent's Game Object. Making decisions at regular step
intervals is generally most appropriate for physics-based simulations. For example, an
agent in a robotic simulator that must provide fine-control of joint torques
should make its decisions every step of the simulation. On the other hand, an
agent that only needs to make decisions when certain game or simulation events
occur, should call Agent.RequestDecision() manually.
Observations
To make decisions, an agent must observe its environment in order to infer the state of the world. A state observation can take the following forms:
- Vector Observation — a feature vector consisting of an array of floating point numbers.
- Visual Observations — one or more camera images and/or render textures.
When you use vector observations for an Agent, implement the
Agent.CollectObservations(VectorSensor sensor) method to create the feature vector. When you use
Visual Observations, you only need to identify which Unity Camera objects
or RenderTextures will provide images and the base Agent class handles the rest.
You do not need to implement the CollectObservations(VectorSensor sensor) method when your Agent
uses visual observations (unless it also uses vector observations).
Vector Observation Space: Feature Vectors
For agents using a continuous state space, you create a feature vector to
represent the agent's observation at each step of the simulation. The Policy
class calls the CollectObservations(VectorSensor sensor) method of each Agent. Your
implementation of this function must call VectorSensor.AddObservation to add vector
observations.
The observation must include all the information an agents needs to accomplish its task. Without sufficient and relevant information, an agent may learn poorly or may not learn at all. A reasonable approach for determining what information should be included is to consider what you would need to calculate an analytical solution to the problem.
For examples of various state observation functions, you can look at the example environments included in the ML-Agents SDK. For instance, the 3DBall example uses the rotation of the platform, the relative position of the ball, and the velocity of the ball as its state observation. As an experiment, you can remove the velocity components from the observation and retrain the 3DBall agent. While it will learn to balance the ball reasonably well, the performance of the agent without using velocity is noticeably worse.
public GameObject ball;

private List<float> state = new List<float>();
public override void CollectObservations(VectorSensor sensor)
{
    sensor.AddObservation(gameObject.transform.rotation.z);
    sensor.AddObservation(gameObject.transform.rotation.x);
    sensor.AddObservation((ball.transform.position.x - gameObject.transform.position.x));
    sensor.AddObservation((ball.transform.position.y - gameObject.transform.position.y));
    sensor.AddObservation((ball.transform.position.z - gameObject.transform.position.z));
    sensor.AddObservation(ball.transform.GetComponent<Rigidbody>().velocity.x);
    sensor.AddObservation(ball.transform.GetComponent<Rigidbody>().velocity.y);
    sensor.AddObservation(ball.transform.GetComponent<Rigidbody>().velocity.z);
}
The feature vector must always contain the same number of elements and observations must always be in the same position within the list. If the number of observed entities in an environment can vary you can pad the feature vector with zeros for any missing entities in a specific observation or you can limit an agent's observations to a fixed subset. For example, instead of observing every enemy agent in an environment, you could only observe the closest five.
When you set up an Agent's Behavior Parameters in the Unity Editor, set the following
properties to use a continuous vector observation:
- Space Size — The state size must match the length of your feature vector.
The observation feature vector is a list of floating point numbers, which means you must convert any other data types to a float or a list of floats.
The VectorSensor.AddObservation method provides a number of overloads for adding common types
of data to your observation vector. You can add Integers and booleans directly to
the observation vector, as well as some common Unity data types such as Vector2,
Vector3, and Quaternion.
Type enumerations should be encoded in the one-hot style. That is, add an element to the feature vector for each element of enumeration, setting the element representing the observed member to one and set the rest to zero. For example, if your enumeration contains [Sword, Shield, Bow] and the agent observes that the current item is a Bow, you would add the elements: 0, 0, 1 to the feature vector. The following code example illustrates how to add.
enum CarriedItems { Sword, Shield, Bow, LastItem }
private List<float> state = new List<float>();
public override void CollectObservations(VectorSensor sensor)
{
    for (int ci = 0; ci < (int)CarriedItems.LastItem; ci++)
    {
        sensor.AddObservation((int)currentItem == ci ? 1.0f : 0.0f);
    }
}
VectorSensor.AddObservation also provides a two-argument version as a shortcut for one-hot
style observations. The following example is identical to the previous one.
enum CarriedItems { Sword, Shield, Bow, LastItem }
const int NUM_ITEM_TYPES = (int)CarriedItems.LastItem;

public override void CollectObservations(VectorSensor sensor)
{
    // The first argument is the selection index; the second is the
    // number of possibilities
    sensor.AddOneHotObservation((int)currentItem, NUM_ITEM_TYPES);
}
Normalization
For the best results when training, you should normalize the components of your feature vector to the range [-1, +1] or [0, 1]. When you normalize the values, the PPO neural network can often converge to a solution faster. Note that it isn't always necessary to normalize to these recommended ranges, but it is considered a best practice when using neural networks. The greater the variation in ranges between the components of your observation, the more likely that training will be affected.
To normalize a value to [0, 1], you can use the following formula:
normalizedValue = (currentValue - minValue)/(maxValue - minValue)
Rotations and angles should also be normalized. For angles between 0 and 360 degrees, you can use the following formulas:
Quaternion rotation = transform.rotation;
Vector3 normalized = rotation.eulerAngles / 180.0f - Vector3.one;  // [-1,1]
Vector3 normalized = rotation.eulerAngles / 360.0f;  // [0,1]
For angles that can be outside the range [0,360], you can either reduce the angle, or, if the number of turns is significant, increase the maximum value used in your normalization formula.
Multiple Visual Observations
Visual observations use rendered textures directly or from one or more cameras in a scene. The Policy vectorizes the textures into a 3D Tensor which can be fed into a convolutional neural network (CNN). For more information on CNNs, see this guide. You can use visual observations along side vector observations.
Agents using visual observations can capture state of arbitrary complexity and are useful when the state is difficult to describe numerically. However, they are also typically less efficient and slower to train, and sometimes don't succeed at all.
Visual observations can be derived from Cameras or RenderTextures within your scene.
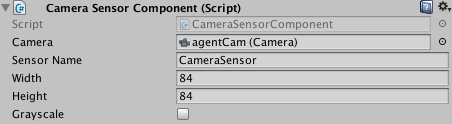
To add a visual observation to an Agent, add either a Camera Sensor Component
or RenderTextures Sensor Component to the Agent. Then drag the camera or
render texture you want to add to the Camera or RenderTexture field.
You can have more than one camera or render texture and even use a combination
of both attached to an Agent. For each visual observation, set the width and height
of the image (in pixels) and whether or not the observation is color or grayscale.
or

Each Agent that uses the same Policy must have the same number of visual observations, and they must all have the same resolutions (including whether or not they are grayscale). Additionally, each Sensor Component on an Agent must have a unique name so that they can be sorted deterministically (the name must be unique for that Agent, but multiple Agents can have a Sensor Component with the same name).
When using RenderTexture visual observations, a handy feature for debugging is
adding a Canvas, then adding a Raw Image with it's texture set to the Agent's
RenderTexture. This will render the agent observation on the game screen.

The GridWorld environment is an example on how to use a RenderTexture for both debugging and observation. Note that in this example, a Camera is rendered to a RenderTexture, which is then used for observations and debugging. To update the RenderTexture, the Camera must be asked to render every time a decision is requested within the game code. When using Cameras as observations directly, this is done automatically by the Agent.

Raycast Observations
Raycasts are an alternative system for the Agent to provide observations based on the physical environment. This can be easily implemented by adding a RayPerceptionSensorComponent3D (or RayPerceptionSensorComponent2D) to the Agent.
During observations, several rays (or spheres, depending on settings) are cast into the physics world, and the objects that are hit determine the observation vector that is produced.
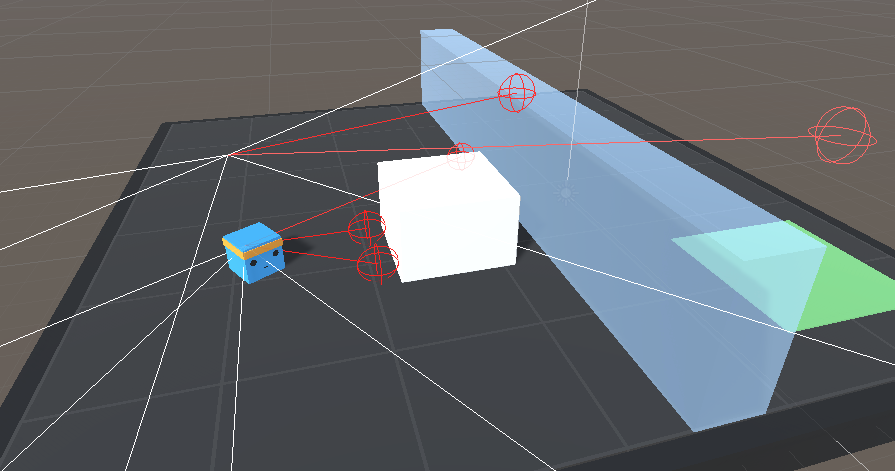
Both sensor components have several settings:
- Detectable Tags A list of strings corresponding to the types of objects that the Agent should be able to distinguish between. For example, in the WallJump example, we use "wall", "goal", and "block" as the list of objects to detect.
- Rays Per Direction Determines the number of rays that are cast. One ray is always cast forward, and this many rays are cast to the left and right.
- Max Ray Degrees The angle (in degrees) for the outermost rays. 90 degrees corresponds to the left and right of the agent.
- Sphere Cast Radius The size of the sphere used for sphere casting. If set to 0, rays will be used instead of spheres. Rays may be more efficient, especially in complex scenes.
- Ray Length The length of the casts
- Observation Stacks The number of previous results to "stack" with the cast
results. Note that this can be independent of the "Stacked Vectors" setting
in
Behavior Parameters. - Start Vertical Offset (3D only) The vertical offset of the ray start point.
- End Vertical Offset (3D only) The vertical offset of the ray end point.
In the example image above, the Agent has two RayPerceptionSensorComponent3Ds. Both use 3 Rays Per Direction and 90 Max Ray Degrees. One of the components had a vertical offset, so the Agent can tell whether it's clear to jump over the wall.
The total size of the created observations is
(Observation Stacks) * (1 + 2 * Rays Per Direction) * (Num Detectable Tags + 2)
so the number of rays and tags should be kept as small as possible to reduce the
amount of data used. Note that this is separate from the State Size defined in
Behavior Parameters, so you don't need to worry about the formula above when
setting the State Size.
Vector Actions
An action is an instruction from the Policy that the agent carries out. The
action is passed to the Agent as a parameter when the Academy invokes the
agent's AgentAction() function. When you specify that the vector action space
is Continuous, the action parameter passed to the Agent is an array of
control signals with length equal to the Vector Action Space Size property.
When you specify a Discrete vector action space type, the action parameter
is an array containing integers. Each integer is an index into a list or table
of commands. In the Discrete vector action space type, the action parameter
is an array of indices. The number of indices in the array is determined by the
number of branches defined in the Branches Size property. Each branch
corresponds to an action table, you can specify the size of each table by
modifying the Branches property.
Neither the Policy nor the training algorithm know anything about what the action
values themselves mean. The training algorithm simply tries different values for
the action list and observes the affect on the accumulated rewards over time and
many training episodes. Thus, the only place actions are defined for an Agent is
in the AgentAction() function. You simply specify the type of vector action
space, and, for the continuous vector action space, the number of values, and
then apply the received values appropriately (and consistently) in
ActionAct().
For example, if you designed an agent to move in two dimensions, you could use either continuous or the discrete vector actions. In the continuous case, you would set the vector action size to two (one for each dimension), and the agent's Policy would create an action with two floating point values. In the discrete case, you would use one Branch with a size of four (one for each direction), and the Policy would create an action array containing a single element with a value ranging from zero to three. Alternatively, you could create two branches of size two (one for horizontal movement and one for vertical movement), and the Policy would create an action array containing two elements with values ranging from zero to one.
Note that when you are programming actions for an agent, it is often helpful to
test your action logic using the Heuristic() method of the Agent,
which lets you map keyboard
commands to actions.
The 3DBall and Area example environments are set up to use either the continuous or the discrete vector action spaces.
Continuous Action Space
When an Agent uses a Policy set to the Continuous vector action space, the
action parameter passed to the Agent's AgentAction() function is an array with
length equal to the Vector Action Space Size property value.
The individual values in the array have whatever meanings that you ascribe to
them. If you assign an element in the array as the speed of an Agent, for
example, the training process learns to control the speed of the Agent through
this parameter.
The Reacher example defines a continuous action space with four control values.

These control values are applied as torques to the bodies making up the arm:
public override void AgentAction(float[] act)
{
    float torque_x = Mathf.Clamp(act[0], -1, 1) * 100f;
    float torque_z = Mathf.Clamp(act[1], -1, 1) * 100f;
    rbA.AddTorque(new Vector3(torque_x, 0f, torque_z));

    torque_x = Mathf.Clamp(act[2], -1, 1) * 100f;
    torque_z = Mathf.Clamp(act[3], -1, 1) * 100f;
    rbB.AddTorque(new Vector3(torque_x, 0f, torque_z));
}
By default the output from our provided PPO algorithm pre-clamps the values of
vectorAction into the [-1, 1] range. It is a best practice to manually clip
these as well, if you plan to use a 3rd party algorithm with your environment.
As shown above, you can scale the control values as needed after clamping them.
Discrete Action Space
When an Agent uses a Discrete vector action space, the
action parameter passed to the Agent's AgentAction() function is an array
containing indices. With the discrete vector action space, Branches is an
array of integers, each value corresponds to the number of possibilities for
each branch.
For example, if we wanted an Agent that can move in an plane and jump, we could define two branches (one for motion and one for jumping) because we want our agent be able to move and jump concurrently. We define the first branch to have 5 possible actions (don't move, go left, go right, go backward, go forward) and the second one to have 2 possible actions (don't jump, jump). The AgentAction method would look something like:
// Get the action index for movement
int movement = Mathf.FloorToInt(act[0]);
// Get the action index for jumping
int jump = Mathf.FloorToInt(act[1]);

// Look up the index in the movement action list:
if (movement == 1) { directionX = -1; }
if (movement == 2) { directionX = 1; }
if (movement == 3) { directionZ = -1; }
if (movement == 4) { directionZ = 1; }
// Look up the index in the jump action list:
if (jump == 1 && IsGrounded()) { directionY = 1; }

// Apply the action results to move the Agent
gameObject.GetComponent<Rigidbody>().AddForce(
    new Vector3(
        directionX * 40f, directionY * 300f, directionZ * 40f));
Note that the above code example is a simplified extract from the AreaAgent class, which provides alternate implementations for both the discrete and the continuous action spaces.
Masking Discrete Actions
When using Discrete Actions, it is possible to specify that some actions are
impossible for the next decision. When the Agent is controlled by a
neural network, the Agent will be unable to perform the specified action. Note
that when the Agent is controlled by its Heuristic, the Agent will
still be able to decide to perform the masked action. In order to mask an
action, override the Agent.CollectDiscreteActionMasks() virtual method, and call DiscreteActionMasker.SetMask() in it:
public override void CollectDiscreteActionMasks(DiscreteActionMasker actionMasker){
    actionMasker.SetMask(branch, actionIndices)
}
Where:
branchis the index (starting at 0) of the branch on which you want to mask the actionactionIndicesis a list ofintcorresponding to the indices of the actions that the Agent cannot perform.
For example, if you have an Agent with 2 branches and on the first branch (branch 0) there are 4 possible actions : "do nothing", "jump", "shoot" and "change weapon". Then with the code bellow, the Agent will either "do nothing" or "change weapon" for his next decision (since action index 1 and 2 are masked)
SetMask(0, new int[2]{1,2})
Notes:
- You can call
SetMaskmultiple times if you want to put masks on multiple branches. - You cannot mask all the actions of a branch.
- You cannot mask actions in continuous control.
Rewards
In reinforcement learning, the reward is a signal that the agent has done something right. The PPO reinforcement learning algorithm works by optimizing the choices an agent makes such that the agent earns the highest cumulative reward over time. The better your reward mechanism, the better your agent will learn.
Note: Rewards are not used during inference by an Agent using a trained model and is also not used during imitation learning.
Perhaps the best advice is to start simple and only add complexity as needed. In general, you should reward results rather than actions you think will lead to the desired results. To help develop your rewards, you can use the Monitor class to display the cumulative reward received by an Agent. You can even use the Agent's Heuristic to control the Agent while watching how it accumulates rewards.
Allocate rewards to an Agent by calling the AddReward() method in the
AgentAction() function. The reward assigned between each decision
should be in the range [-1,1]. Values outside this range can lead to
unstable training. The reward value is reset to zero when the agent receives a
new decision. If there are multiple calls to AddReward() for a single agent
decision, the rewards will be summed together to evaluate how good the previous
decision was. There is a method called SetReward() that will override all
previous rewards given to an agent since the previous decision.
Examples
You can examine the AgentAction() functions defined in the example
environments to see how those projects
allocate rewards.
The GridAgent class in the GridWorld
example uses a very simple reward
system:
Collider[] hitObjects = Physics.OverlapBox(trueAgent.transform.position,
                                           new Vector3(0.3f, 0.3f, 0.3f));
if (hitObjects.Where(col => col.gameObject.tag == "goal").ToArray().Length == 1)
{
    AddReward(1.0f);
    Done();
}
if (hitObjects.Where(col => col.gameObject.tag == "pit").ToArray().Length == 1)
{
    AddReward(-1f);
    Done();
}
The agent receives a positive reward when it reaches the goal and a negative reward when it falls into the pit. Otherwise, it gets no rewards. This is an example of a sparse reward system. The agent must explore a lot to find the infrequent reward.
In contrast, the AreaAgent in the Area
example gets a small negative
reward every step. In order to get the maximum reward, the agent must finish its
task of reaching the goal square as quickly as possible:
AddReward( -0.005f);
MoveAgent(act);

if (gameObject.transform.position.y < 0.0f ||
    Mathf.Abs(gameObject.transform.position.x - area.transform.position.x) > 8f ||
    Mathf.Abs(gameObject.transform.position.z + 5 - area.transform.position.z) > 8)
{
    Done();
    AddReward(-1f);
}
The agent also gets a larger negative penalty if it falls off the playing surface.
The Ball3DAgent in the
3DBall takes a
similar approach, but allocates a small positive reward as long as the agent
balances the ball. The agent can maximize its rewards by keeping the ball on the
platform:
if (IsDone() == false)
{
    SetReward(0.1f);
}

// When ball falls mark Agent as done and give a negative penalty
if ((ball.transform.position.y - gameObject.transform.position.y) < -2f ||
    Mathf.Abs(ball.transform.position.x - gameObject.transform.position.x) > 3f ||
    Mathf.Abs(ball.transform.position.z - gameObject.transform.position.z) > 3f)
{
    Done();
    SetReward(-1f);
}
The Ball3DAgent also assigns a negative penalty when the ball falls off the
platform.
Note that all of these environments make use of the Done() method, which manually
terminates an episode when a termination condition is reached. This can be
called independently of the Max Step property.
Agent Properties
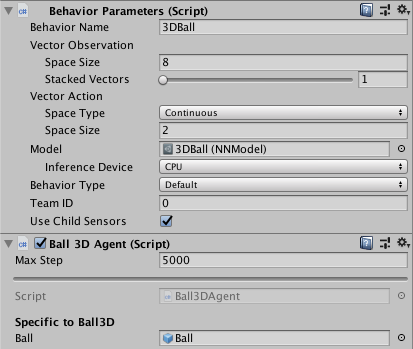
Behavior Parameters- The parameters dictating what Policy the Agent will receive.Behavior Name- The identifier for the behavior. Agents with the same behavior name will learn the same policy. If you're using curriculum learning, this is used as the top-level key in the config.Vector ObservationSpace Size- Length of vector observation for the Agent.Stacked Vectors- The number of previous vector observations that will be stacked and used collectively for decision making. This results in the effective size of the vector observation being passed to the Policy being: Space Size x Stacked Vectors.
Vector ActionSpace Type- Corresponds to whether action vector contains a single integer (Discrete) or a series of real-valued floats (Continuous).Space Size(Continuous) - Length of action vector.Branches(Discrete) - An array of integers, defines multiple concurrent discrete actions. The values in theBranchesarray correspond to the number of possible discrete values for each action branch.
Model- The neural network model used for inference (obtained after training)Inference Device- Whether to use CPU or GPU to run the model during inferenceBehavior Type- Determines whether the Agent will do training, inference, or use its Heuristic() method:Default- the Agent will train if they connect to a python trainer, otherwise they will perform inference.Heuristic Only- the Agent will always use theHeuristic()method.Inference Only- the Agent will always perform inference.
Team ID- Used to define the team for self-playUse Child Sensors- Whether to use all Sensor components attached to child GameObjects of this Agent.
Max Step- The per-agent maximum number of steps. Once this number is reached, the Agent will be reset.
Monitoring Agents
We created a helpful Monitor class that enables visualizing variables within a
Unity environment. While this was built for monitoring an agent's value function
throughout the training process, we imagine it can be more broadly useful. You
can learn more here.
Destroying an Agent
You can destroy an Agent GameObject during the simulation. Make sure that there is always at least one Agent training at all times by either spawning a new Agent every time one is destroyed or by re-spawning new Agents when the whole environment resets.