19 KiB
Location Kit (HMS)
Service Introduction
Location Kit combines the Global Navigation Satellite System (GNSS), Wi-Fi, and base station location functionalities into your app to build up global positioning capabilities, allowing you to provide flexible location-based services for global users. Currently, it provides three main capabilities: fused location, activity identification, and geofence. You can call one or more of these capabilities as needed.
-
Fused location: Provides a set of easy-to-use APIs for your app to quickly obtain the device location based on the GNSS, Wi-Fi, and base station location data.
-
Activity identification: Identifies user activity status through the acceleration sensor, cellular network information, and magnetometer, helping you adapt your app to user behavior.
-
Geofence: Allows you to set an interested area through an API so that your app can receive a notification when a specified action (such as leaving, entering, or staying in the area) occurs.
Use Cases
Fused Location
If your app needs to obtain the device location, you need to apply for the location permission for your app, call the requestLocationUpdates method of Location Kit, set request parameters in LocationRequest, and specify a location mode as needed. To stop obtaining location information, call the removeLocationUpdates method.
NOTE:
The fused location function uses the WGS-84 coordinate system for the returned locations.
Activity Identification
Your app can obtain the activity status (such as walking, running, or cycling) of a device in either of the following methods:
-
Method 1: Call the createActivityIdentificationUpdates method to proactively obtain the current device activity status. In this method, you can set the interval (in milliseconds) for detecting activity identification updates. Larger values will result in fewer activity detections, and smaller values will result in more activity detections. To stop requesting activity identification updates, call the deleteActivityIdentificationUpdates method.
-
Method 2: Call the createActivityConversionUpdates method to detect activity conversion updates of the current device. The interval for detecting activity conversion updates is 5 seconds when the screen is on and 200 seconds when the screen is off. You can select an activity status for detection. For details about all activity statuses, please refer to Constant-values. To stop requesting activity conversion updates, call the deleteActivityConversionUpdatesmethod.
Geofence
You can call the createGeofenceList method to create a geofence based on the location that is of interest. Then, Location Kit can sense the distance between the current device location and the geofence. When the device enters the geofence, a notification will be sent to your app. In addition, Location Kit can detect the duration during which the device stays in the geofence, and send a notification to your app if the stay duration reaches your preset limit.
You can also create a geofence by dragging to select an area on the map and setting relevant parameters. For details, please refer to Server Development.
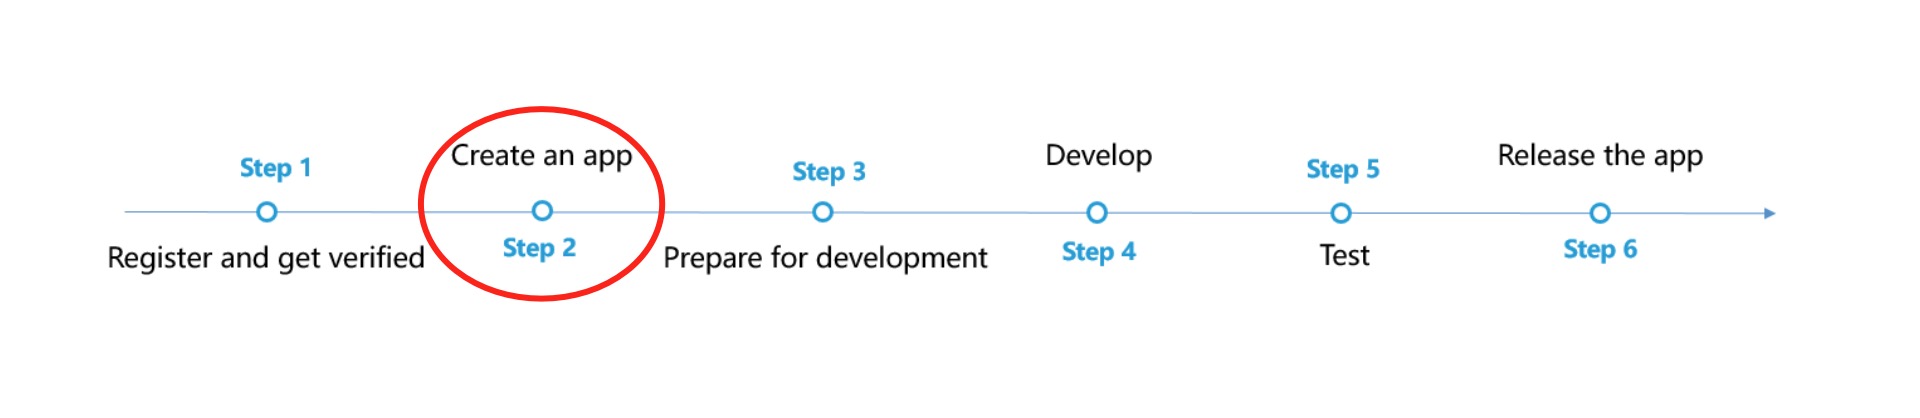
Integrating into Your Unity Project
Register and get verified
Before doing this step, you need to create an HMS Account, project and App according to the HMS document.


Now you have your Huawei HMS Project and App information.
Create an app
Create Unity project, and you will also need to set up the build environment for building Android apk with HMS SDK. Then, finish the following preparation.
In Editor -> Build Settings, Switch platform to Andriod and Connect your Android device

In Player Settings -> Publishing Settings, enable the following environment checkboxes

Prepare for development
According to HMS integration process introduction, we still need to add some configurations to the gradle files for development preparations.

You can follow Huawei documentation guidance to do the configuration, you can also refer and compare with the files in our Unity example project.
-
Enable and add configurations to
AndroidManifest.xmlGo to Edit -> Project Settings -> Player -> Android(icon) -> Publishing Settings -> Build
Enable Custom Main Manifest
We should enable AndroidManifest when we use push or location sdk.
If Unity Version is 2019.2 or before, there is no AndroidManifest checkbox, but you can put
AndroidManifest.xmlunderAssets/Plugins/Android.<?xml version="1.0" encoding="utf-8"?> <!-- GENERATED BY UNITY. REMOVE THIS COMMENT TO PREVENT OVERWRITING WHEN EXPORTING AGAIN--> <manifest xmlns:android="http://schemas.android.com/apk/res/android" package="com.unity3d.player" xmlns:tools="http://schemas.android.com/tools"> <uses-permission android:name="android.permission.ACCESS_COARSE_LOCATION"/> <uses-permission android:name="android.permission.ACCESS_FINE_LOCATION"/> <uses-permission android:name="android.permission.ACCESS_BACKGROUND_LOCATION" /> <uses-permission android:name="com.huawei.hms.permission.ACTIVITY_RECOGNITION" /> <uses-permission android:name="android.permission.ACTIVITY_RECOGNITION" /> <uses-permission android:name="android.permission.ACCESS_MOCK_LOCATION" /> <application> <activity android:name="com.hms.hms_analytic_activity.HmsAnalyticActivity" android:theme="@style/UnityThemeSelector"> <intent-filter> <action android:name="android.intent.action.MAIN" /> <category android:name="android.intent.category.LAUNCHER" /> </intent-filter> <meta-data android:name="unityplayer.UnityActivity" android:value="true" /> </activity> <service android:name="com.unity.hms.push.MyPushService" android:exported="false"> <intent-filter> <action android:name="com.huawei.push.action.MESSAGING_EVENT"/> </intent-filter> </service> <receiver android:name="com.unity.hms.location.LocationBroadcastReceiver" android:exported="true"> <intent-filter> <action android:name="com.huawei.hmssample.location.LocationBroadcastReceiver.ACTION_PROCESS_LOCATION" /> </intent-filter> </receiver> <receiver android:name="com.unity.hms.location.GeoFenceBroadcastReceiver" android:exported="true"> <intent-filter> <action android:name="com.huawei.hmssample.geofence.GeoFenceBroadcastReceiver.ACTION_PROCESS_LOCATION" /> </intent-filter> </receiver> </application> </manifest> -
Enable and add configurations to project gradle
Go to Edit -> Project Settings -> Player -> Android(icon) -> Publishing Settings -> Build
Enable Custom Base Gradle Template and add the AppGallery Connect plugin and the Maven repository. The path is
Assets/Plugins/Android/baseProjectTemplate.gradle.If your unity version is 2019.2 or before, you should add implement and other configuration on
MainGradleTemplate.gradle.// GENERATED BY UNITY. REMOVE THIS COMMENT TO PREVENT OVERWRITING WHEN EXPORTING AGAIN allprojects { buildscript { repositories {**ARTIFACTORYREPOSITORY** google() jcenter() maven { url 'https://developer.huawei.com/repo/' } } dependencies { // If you are changing the Android Gradle Plugin version, make sure it is compatible with the Gradle version preinstalled with Unity // See which Gradle version is preinstalled with Unity here https://docs.unity3d.com/Manual/android-gradle-overview.html // See official Gradle and Android Gradle Plugin compatibility table here https://developer.android.com/studio/releases/gradle-plugin#updating-gradle // To specify a custom Gradle version in Unity, go do "Preferences > External Tools", uncheck "Gradle Installed with Unity (recommended)" and specify a path to a custom Gradle version classpath 'com.android.tools.build:gradle:3.6.4' classpath 'com.huawei.agconnect:agcp:1.6.1.300' **BUILD_SCRIPT_DEPS** } } repositories {**ARTIFACTORYREPOSITORY** google() jcenter() flatDir { dirs "${project(':unityLibrary').projectDir}/libs" } maven { url 'https://developer.huawei.com/repo/' } } } task clean(type: Delete) { delete rootProject.buildDir } -
Enable and add configurations to app gradle
Go to Edit -> Project Settings -> Player -> Android(icon) -> Publishing Settings -> Build
Enable Custom Launcher Gradle Template and add build dependencies in
launcherTemplate.gradle. The path isAssets/Plugins/Android/launcherTmeplate.gradle.If unity version is 2019.2 or before, you should add implement and other configuration on
MainGradleTemplate.dependencies { implementation project(':unityLibrary') implementation 'com.huawei.hms:location:5.0.0.302' implementation 'com.android.support:appcompat-v7:28.0.0' implementation 'com.huawei.hms:hwid:6.1.0.303' } -
Enable and add configurations to unity library gradle
Go to Edit -> Project Settings -> Player -> Android(icon) -> Publishing Settings -> Build
Enable Custom Main Gradle Template and add build dependencies. The path is
Assets/Plugins/Android/mainTemplate.gradle.If unity version is 2019.2 or before, you should add implement and other configuration on
MainGradleTemplate.gradle.dependencies { implementation fileTree(dir: 'libs', include: ['*.jar']) implementation 'com.huawei.hms:hianalytics:5.0.0.301' implementation 'com.huawei.agconnect:agconnect-core:1.6.1.300' implementation 'com.huawei.hms:hwid:6.1.0.303' implementation 'com.huawei.hms:game:6.1.0.301' **DEPS**} -
Signature
Go to Edit -> Project Settings -> Player -> Android(icon) -> Publishing Settings -> Keystore Manager
Click Keytore... -> create new

You need to enter the password when you open unity, otherwise you cannot build. There's no need to add a signature on gradle.
-
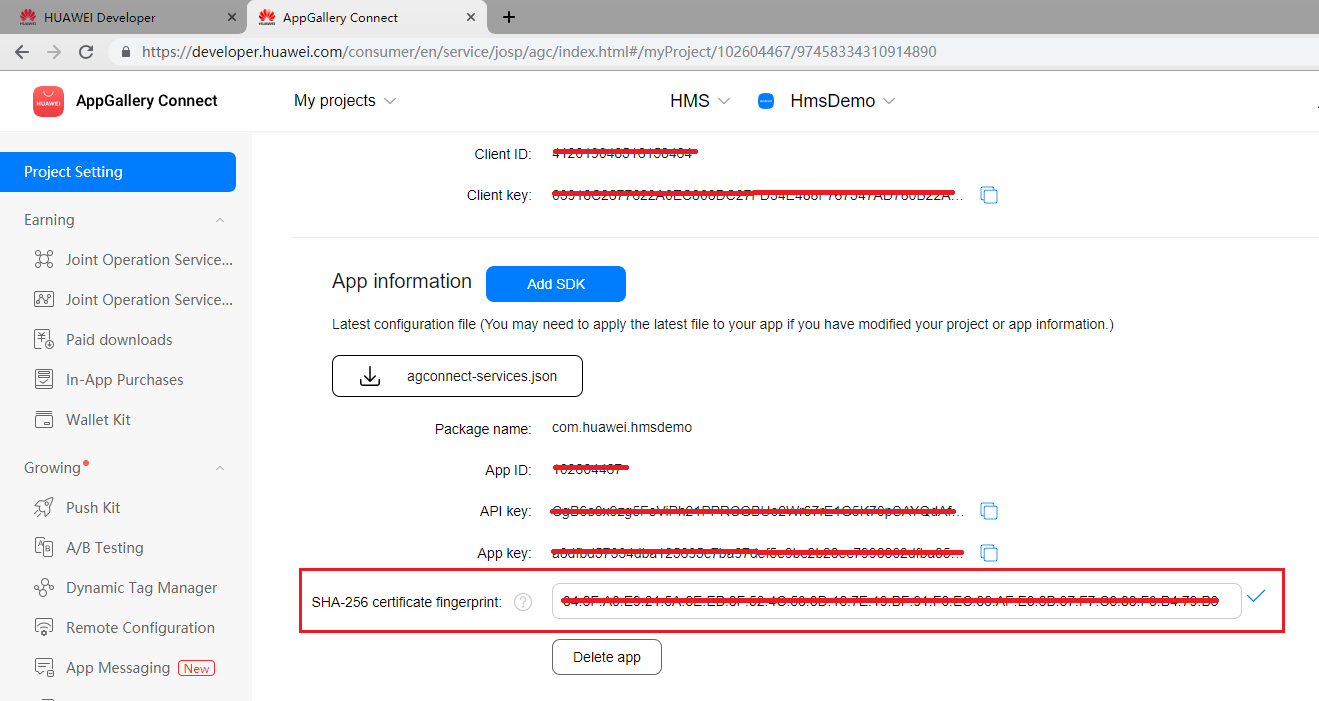
Signing Certificate Fingerprint
Please refer to Huawei preparation documentation step 4 for generating a SHA256 Certificate Fingerprint.

And refer to Huawei preparation documentation step 5 to add Fingerprint to AppGallery Connect.
-
Package name
Set the package name in Edit -> Project Settings -> Player
The package name is
com.${Company Name}.${Product Name}.You can also complete the rest of the settings here, such as version number, icons, resolution, etc.

-
agconnect-services.jsonWe should put the json file under
Assets/Plugins/Android.Add this following message into the json file downloaded from your Huawei developer dashboard. Also, you can refer to that file in our Unity example project.
"agcgw":{
"backurl":"connect-drcn.dbankcloud.cn",
"url":"connect-drcn.hispace.hicloud.com"
},
You can refer to this link to create
agconnect-services.json.
-
Configuring Obfuscation Scripts
Before building the APK, configure the obfuscation configuration file to prevent the HMS Core SDK from being obfuscated.(Reference)
- Open the proguard file in your Unity project and add configurations to exclude the HMS Core SDK from obfuscation.
-ignorewarnings -keepattributes *Annotation* -keepattributes Exceptions -keepattributes InnerClasses -keepattributes Signature -keepattributes SourceFile,LineNumberTable -keep class com.huawei.hianalytics.**{*;} -keep class com.huawei.updatesdk.**{*;} -keep class com.huawei.hms.**{*;} -keep class * extends com.huawei.location.router.LocationApiRequest{ *; } -keep class * extends com.huawei.hms.core.aidl.IMessageEntity{ *; } -keep public class com.huawei.location.nlp.network.** {*; } -keep class com.huawei.wisesecurity.ucs.**{*;}- (Optional) Configure the keep.xml file as follows to keep layout resources if you have enabled R8 resource shrinking (with shrinkResources being set to true in the project-level build.gradle file) and strict reference checks (with shrinkMode being set to strict in the res/raw/keep.xml file). Not keeping layout resources will lead to app rejection during release to HUAWEI AppGallery.
<?xml version="1.0" encoding="utf-8"?> <resources xmlns:tools="http://schemas.android.com/tools" tools:keep="@layout/hms_download_progress,@drawable/screen_off" tools:shrinkMode="strict" /> -
Get activity
For getting the activity, you can use the Common.GetActivity() function.
Developing with the SDK
Developing
There are corresponding example scenes in the example project for all 4 Kits. For testing, you will need to build it onto Android mobile build by HMS. Make sure you have already created your HMS account and project. Then, you can change the configuration and test different functions.

We need to add implentment com.android.support:appcompat-v7:28.0.0 to launcherTemplate.
In the example project, the corresponding scene for Location Kit is Assets/HuaweiServiceDemo/Scenes/HmsLocationSampleScene.unity and the code is Assets/HuaweiServiceDemo/Scripts/test/location/LocationTest.cs.
We need to set receiver.
-
LocationBroadcastReceiver
-
Implement interface
IBroadcastReceiver -
Get Receiver by method
BroadcastRegister.CreateLocationReceiver -
Add the following code to
AndroidManifest.xml<application> ... <receiver android:name="com.unity.hms.location.LocationBroadcastReceiver" android:exported="true"> <intent-filter> <action android:name=`${Your action name}` /> </intent-filter> </receiver> ... </application>android:nameis fixed.You can set the value of
action android:name. But the value should be the same as the parameter ofintent.setAction.
-
-
GeoFenceReceiver
-
Implement interface
IBroadcastReceiver -
Get Receiver by method
BroadcastRegister.CreateGeoFenceReceiver -
Add the following code to
AndroidManifest.xml<application> ... <receiver android:name="com.unity.hms.location.GeoFenceBroadcastReceiver" android:exported="true"> <intent-filter> <action android:name=`${Your action name}` /> </intent-filter> </receiver> ... </application>android:nameis fixed.You can set the value of
action android:name. But the value should be the same as the parameter ofintent.setAction.
-
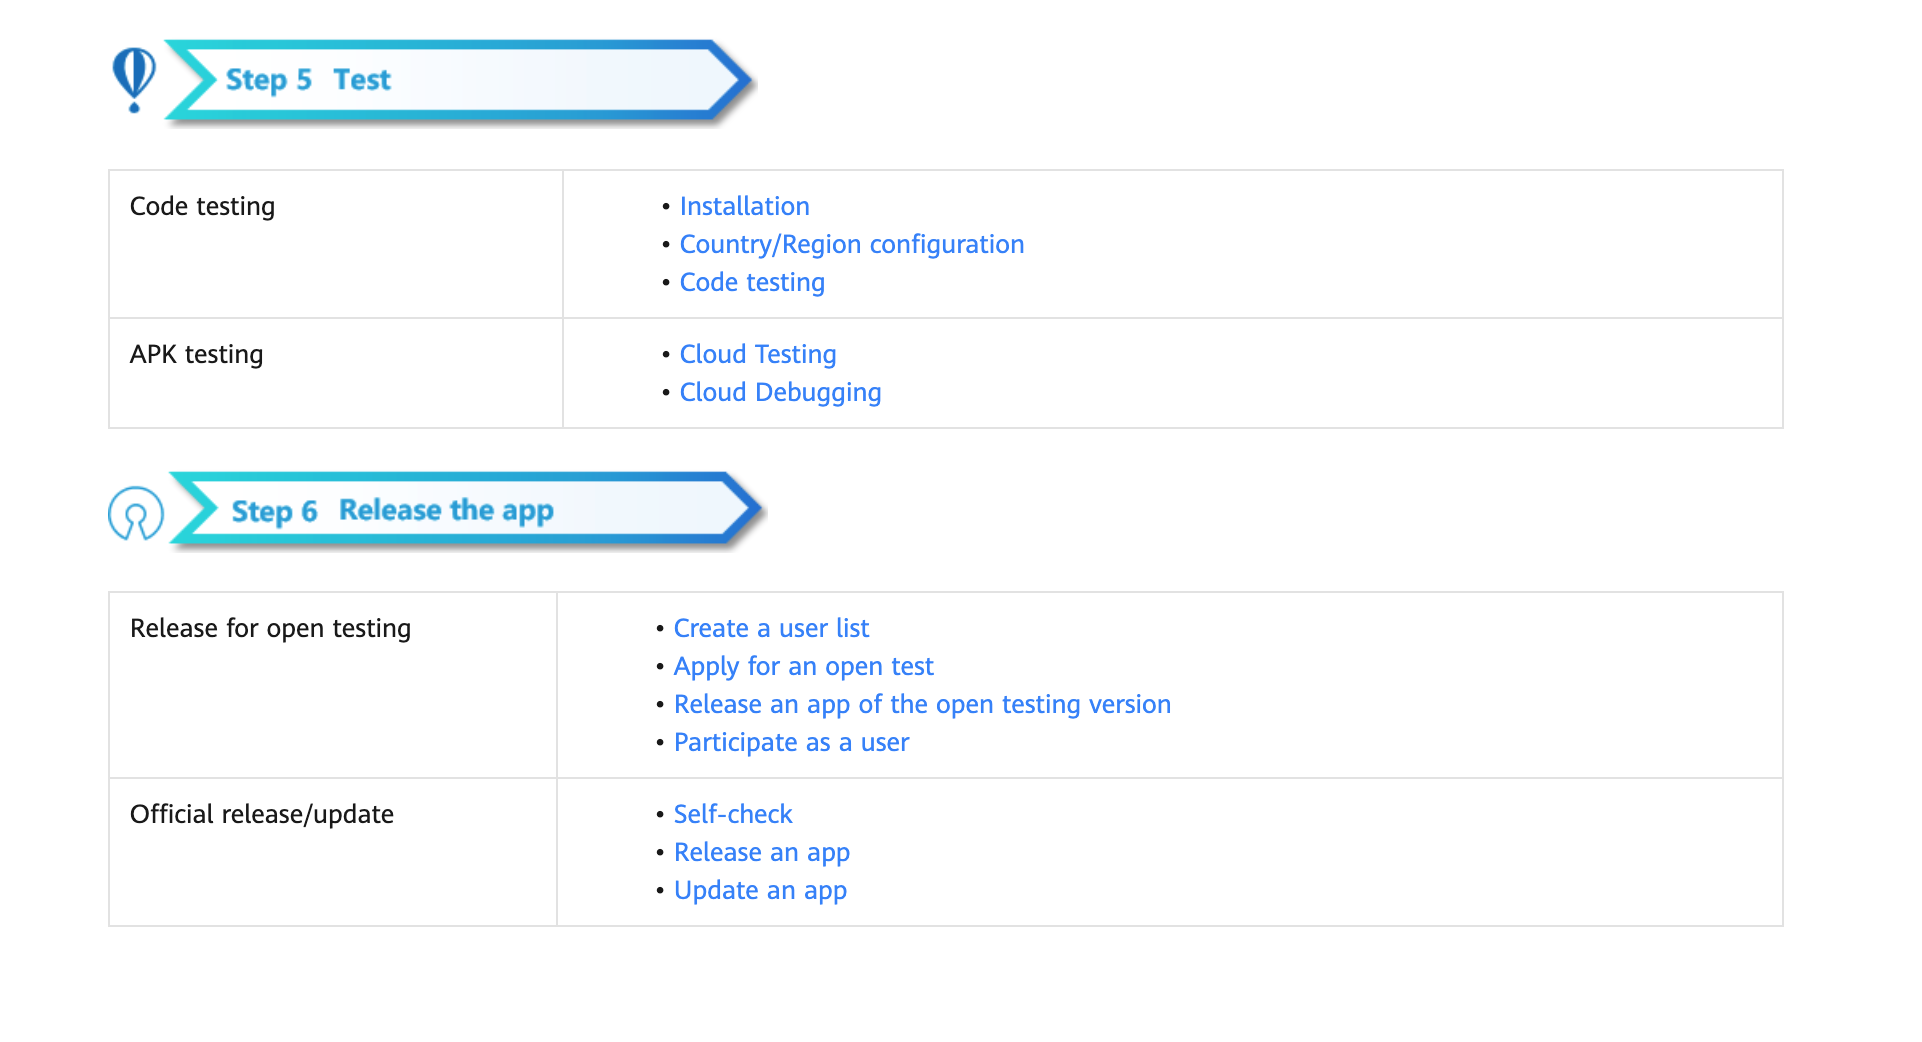
Test & Release
Please refer to Huawei integration procedure for testing and releasing.