19 KiB
定位服务 (HMS)
业务介绍
定位服务(Location Kit)采用卫星导航系统(Global Navigation Satellite System,以下简称GNSS)、Wi-Fi、基站等多途径的混合定位模式进行定位,赋予您的应用快速、精准地获取用户位置信息的能力,构建全球定位服务能力,助力您发展全球业务。当前定位服务的主要能力包含三个部分:融合定位、活动识别和地理围栏,您可以根据自己的需求,调用相应的能力。
-
融合定位:结合GNSS、Wi-Fi和基站位置数据,为您提供一套简单易用的API,方便您快速获取设备位置信息。
-
活动识别:通过加速度传感器、蜂窝网络信息、磁力计识别用户运动状态,便于您通过了解用户行为来调整您的应用。
-
地理围栏:您可通过API设置感兴趣的位置区域,在指定操作(如离开、进入、驻留)发生时,即可及时收到一个通知。
场景介绍
融合定位
如果您的应用需要请求设备位置信息,首先您需要为应用申请位置权限,然后调用HMS Core的请求位置更新方法(requestLocationUpdates),设置不同的请求(LocationRequest)参数,根据您的需要指定定位方式,获取持续的位置信息回调。如果您获取位置信息后,想取消位置信息回调,可以调用移除位置更新方法(removeLocationUpdates),达到取消回调的目的。
说明:
融合定位返回的位置信息使用WGS-84坐标系。
活动识别
如果您的应用需要获取设备的运动状态,例如:步行、跑步、骑自行车等。可以通过以下两种方式获取设备的运动状态:
-
方式一:通过调用活动状态识别更新方法(createActivityIdentificationUpdates)主动获取当前设备的运动状态。您可以设置检测的时间间隔,以毫秒为单位,检测间隔时间越长,活动检测越少,检测间隔时间越短,活动检测越频繁;调用deleteActivityIdentificationUpdates方法即可移除活动识别更新。
-
方式二:通过调用活动状态转换方法(createActivityConversionUpdates)监听当前设备的活动状态转换,监听的时间亮屏是5秒,灭屏是200秒。您可以选定需要监听的运动状态,点击Constant-values查看所有的运动状态;调用deleteActivityConversionUpdates方法即可移除监听。
地理围栏
如果您对某些地点比较关注,您可以根据关注地点的位置,创建地理围栏createGeofenceList,地理围栏可以感知当前设备所在位置和您的关注目标之间的距离,当用户进入围栏区域时,会向应用发起通知。同时,您可以检测用户在围栏内的停留时间,当用户在围栏内停留一段时间之后,再发起通知。
地理围栏同时支持页面操作,通过基于地图的拖拽和参数填写创建地理围栏,详情参见服务端开发。
Unity项目集成设置
注册认证
在开始之前,首先您需要创建华为开发者账号,项目,以及App。请参考华为HMS文档

我们默认您已经创建并拥有了华为HMS项目,以及对应的App信息
创建应用
在您的Unity项目中完成以下构建环境的设置,以便使用华为HMS SDK构建安卓 APK。

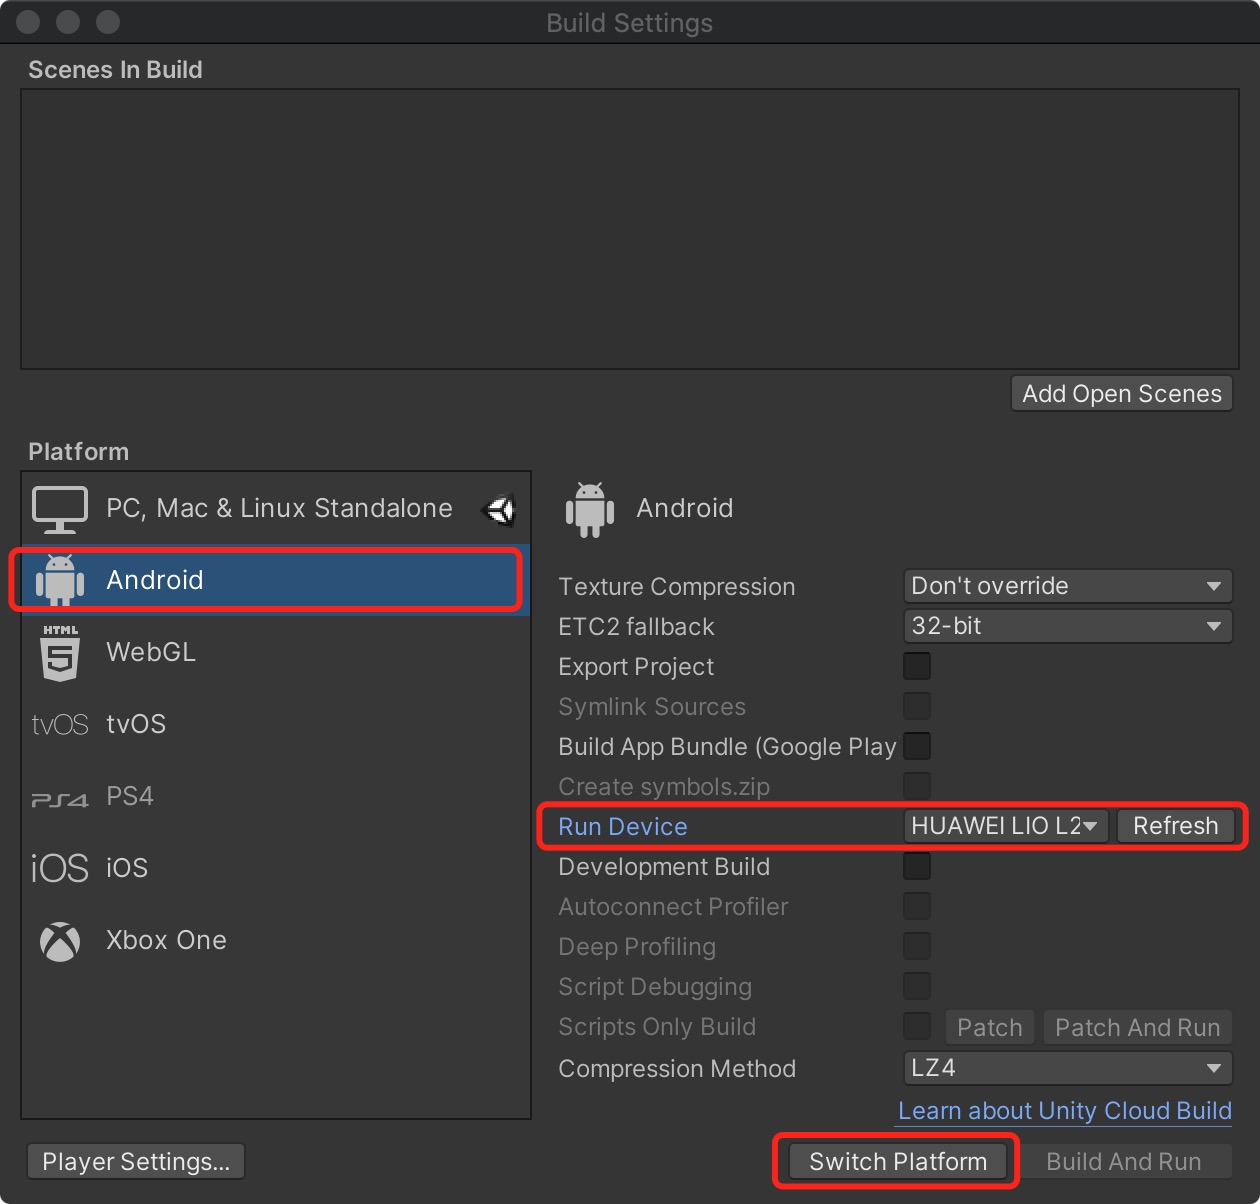
进入 Editor -> Build Settings -> Platform -> Andriod, 点击 Switch Platform 切换到安卓平台。
进入 Player Settings -> Publishing Settings,勾选以下环境配置项目。

开发准备
按照华为HMS 集成开发指南介绍,我们仍需要对这些Gradle文件做进一步开发准备的设置。

您可以根据华为HMS Core集成准备对自己对文件进行配置。您也可以从我们的示例项目中的具体参数设置,进行参考与对比,完成以下一系列的开发准备配置。
-
启用并对
AndroidManifest.xml做以下配置进入 Edit -> Project Settings -> Player -> Android(icon) -> Publishing Settings -> Build
启用 Custom Main Manifest
当使用“推送服务” 和“定位服务” 的时候,我们需要启用 AndroidManifest
如果您的Unity版本低于2019.2(含),上述设置界面中并没有 AndroidManifest 选项,但您可以将
AndroidManifest.xml文件手动放置到Assets/Plugins/Android路径下。<?xml version="1.0" encoding="utf-8"?> <!-- GENERATED BY UNITY. REMOVE THIS COMMENT TO PREVENT OVERWRITING WHEN EXPORTING AGAIN--> <manifest xmlns:android="http://schemas.android.com/apk/res/android" package="com.unity3d.player" xmlns:tools="http://schemas.android.com/tools"> <uses-permission android:name="android.permission.ACCESS_COARSE_LOCATION"/> <uses-permission android:name="android.permission.ACCESS_FINE_LOCATION"/> <uses-permission android:name="android.permission.ACCESS_BACKGROUND_LOCATION" /> <uses-permission android:name="com.huawei.hms.permission.ACTIVITY_RECOGNITION" /> <uses-permission android:name="android.permission.ACTIVITY_RECOGNITION" /> <uses-permission android:name="android.permission.ACCESS_MOCK_LOCATION" /> <application> <activity android:name="com.hms.hms_analytic_activity.HmsAnalyticActivity" android:theme="@style/UnityThemeSelector"> <intent-filter> <action android:name="android.intent.action.MAIN" /> <category android:name="android.intent.category.LAUNCHER" /> </intent-filter> <meta-data android:name="unityplayer.UnityActivity" android:value="true" /> </activity> <service android:name="com.unity.hms.push.MyPushService" android:exported="false"> <intent-filter> <action android:name="com.huawei.push.action.MESSAGING_EVENT"/> </intent-filter> </service> <receiver android:name="com.unity.hms.location.LocationBroadcastReceiver" android:exported="true"> <intent-filter> <action android:name="com.huawei.hmssample.location.LocationBroadcastReceiver.ACTION_PROCESS_LOCATION" /> </intent-filter> </receiver> <receiver android:name="com.unity.hms.location.GeoFenceBroadcastReceiver" android:exported="true"> <intent-filter> <action android:name="com.huawei.hmssample.geofence.GeoFenceBroadcastReceiver.ACTION_PROCESS_LOCATION" /> </intent-filter> </receiver> </application> </manifest> -
启用并对project gradle文件添加配置
进入 Edit -> Project Settings -> Player -> Android(icon) -> Publishing Settings -> Build ,启用 Custom Base Gradle Template 并在文件中添加 AppGallery Connect plugin 和 Maven repository。路径是
Assets/Plugins/Android/baseProjectTemplate.gradle。如果您的Unity版本低于2019.2(含),则需要在
MainGradleTemplate.gradle中添加配置。allprojects { buildscript { repositories {**ARTIFACTORYREPOSITORY** google() jcenter() maven { url 'https://developer.huawei.com/repo/' } } dependencies { // If you are changing the Android Gradle Plugin version, make sure it is compatible with the Gradle version preinstalled with Unity // See which Gradle version is preinstalled with Unity here https://docs.unity3d.com/Manual/android-gradle-overview.html // See official Gradle and Android Gradle Plugin compatibility table here https://developer.android.com/studio/releases/gradle-plugin#updating-gradle // To specify a custom Gradle version in Unity, go do "Preferences > External Tools", uncheck "Gradle Installed with Unity (recommended)" and specify a path to a custom Gradle version classpath 'com.android.tools.build:gradle:3.6.4' classpath 'com.huawei.agconnect:agcp:1.6.1.300' **BUILD_SCRIPT_DEPS** } } repositories {**ARTIFACTORYREPOSITORY** google() jcenter() flatDir { dirs "${project(':unityLibrary').projectDir}/libs" } maven { url 'https://developer.huawei.com/repo/' } } } task clean(type: Delete) { delete rootProject.buildDir } -
启用并对app gradle文件添加配置
进入 Edit -> Project Settings -> Player -> Android(icon) -> Publishing Settings -> Build,启用 Custom Launcher Gradle Template 并在
launcherTemplate.gradle中添加依赖。路径为Assets/Plugins/Android/LauncherTemplate.gradle。如果您的Unity版本低于2019.2(含), 则需要在
MainGradleTemplate.gradle中添加配置。dependencies { implementation project(':unityLibrary') implementation 'com.huawei.hms:ads-lite:13.4.29.303' implementation 'com.huawei.hms:ads-consent:3.4.30.301' implementation 'com.huawei.hms:push:4.0.3.301' implementation 'com.huawei.hms:hianalytics:5.1.0.300' implementation 'com.android.support:appcompat-v7:28.0.0' implementation 'com.huawei.hms:hianalytics:5.0.0.301' implementation 'com.huawei.agconnect:agconnect-core:1.6.1.300' implementation 'com.huawei.hms:hwid:6.1.0.303' implementation 'com.huawei.hms:game:6.1.0.301' } -
使用并对unity library gradle文件进行以下设置
进入 Edit -> Project Settings -> Player -> Android(icon) -> Publishing Settings -> Build,启用 Custom Main Gradle Template 并在
mainTemplate.gradle中添加依赖。路径为Assets/Plugins/Android/mainTemplate.gradle.gradle。如果您的Unity版本低于2019.2(含), 则需要在
MainGradleTemplate.gradle中添加配置。dependencies { implementation fileTree(dir: 'libs', include: ['*.jar']) implementation 'com.huawei.hms:hianalytics:5.0.0.301' implementation 'com.huawei.agconnect:agconnect-core:1.6.1.300' implementation 'com.huawei.hms:hwid:6.1.0.303' implementation 'com.huawei.hms:game:6.1.0.301' **DEPS**} -
创建Signature
进入 Edit -> Project Settings -> Player -> Android(icon) -> Publishing Settings -> Keystore Manager, 点击 Keytore... -> create new

您需要在打开unity时设定并输入密码,否则将无法构建。无需在 gradle 中添加signature。
-
签署证书指纹
参照华为HMS Core集成准备 Step4 生成SHA256证书指纹

参照华为HMS Core集成准备 Step5在AppGAllery Connect里添加指纹。

-
设置package name,及其他设置
进入 Edit -> Project Settings -> Player设置package name。
package name格式为
com.${Company Name}.${Product Name}同时也可以在此步骤完成其余的所需设置,比如您的应用版本号、应用的图标、设置显示的分辨率等。

-
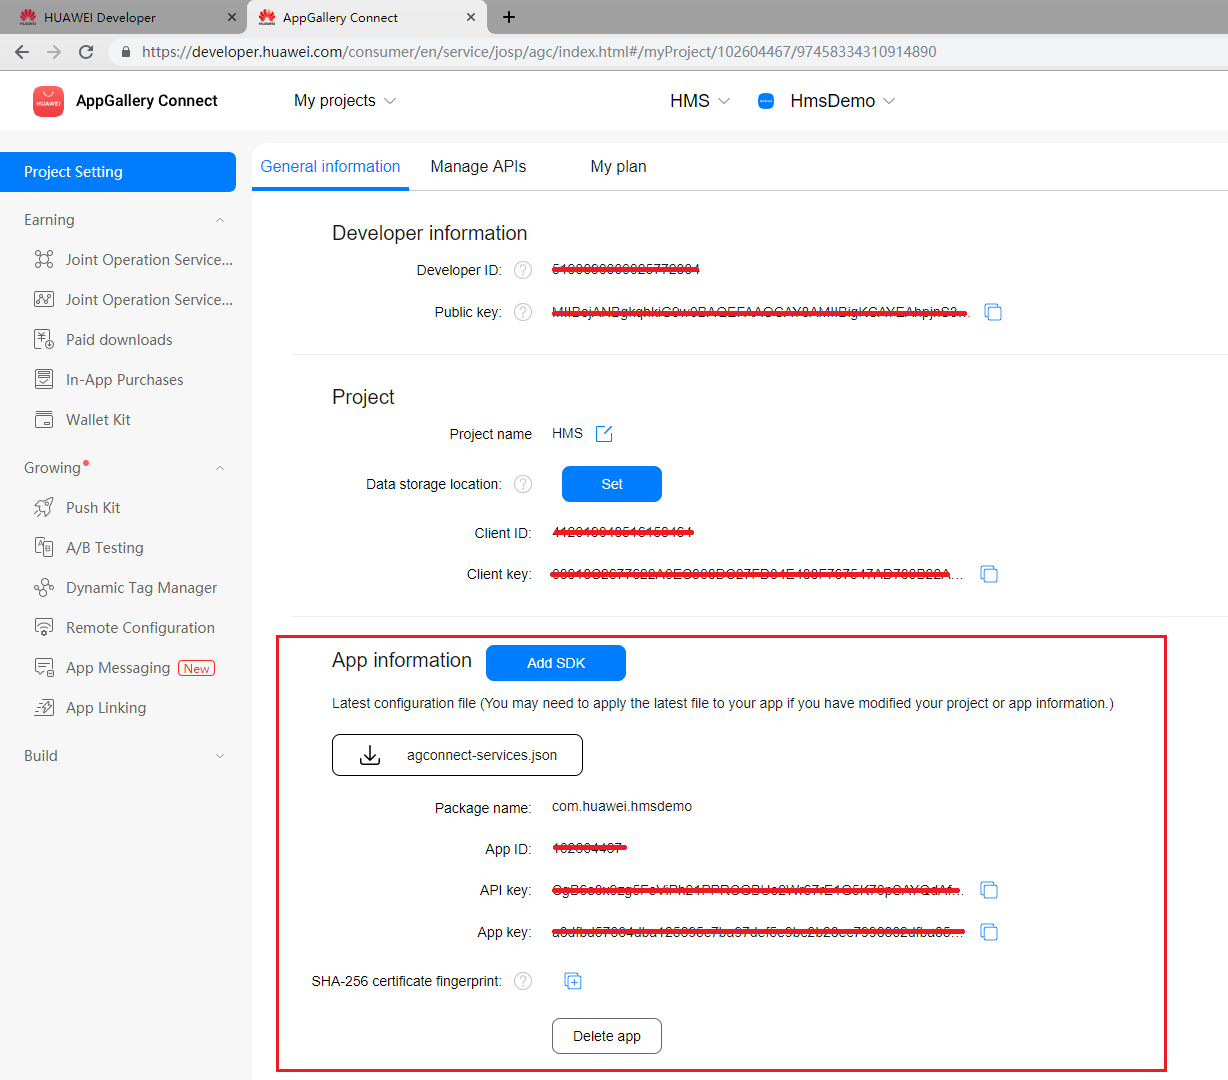
Agconnect-services.json我们还需要从华为开发者账号内下载这个json文件,加入所需信息后,放到
Assets/Plugins/Android路径下。从华为开发者账号内下载此json 文件并在其中加以下信息。同样的,您可以在我们的示例项目文件中直接参考!
"agcgw":{
"backurl":"connect-drcn.dbankcloud.cn",
"url":"connect-drcn.hispace.hicloud.com"
},
当我们使用“分析服务”、“推送服务”、或“定位服务”时,必须配置
agconnect-services.json文件。参考 链接 以创建
agconnect-services.json
-
配置混淆脚本
编译APK前需要配置混淆配置文件,避免混淆HMS Core SDK导致功能异常。(参考文档)
- 在您的Unity项目里打开混淆配置文件,加入排除HMS Core SDK的混淆配置。
-ignorewarnings -keepattributes *Annotation* -keepattributes Exceptions -keepattributes InnerClasses -keepattributes Signature -keepattributes SourceFile,LineNumberTable -keep class com.huawei.hianalytics.**{*;} -keep class com.huawei.updatesdk.**{*;} -keep class com.huawei.hms.**{*;} -keep class * extends com.huawei.hms.core.aidl.IMessageEntity{ *; } -keep public class com.huawei.location.nlp.network.** {*; } -keep class com.huawei.wisesecurity.ucs.**{*;}- (可选)当您启用R8资源缩减(项目级“build.gradle”文件中shrinkResources属性为“true”)和严格引用检查(“res/raw/keep.xml”文件中的shrinkMode为“strict”)时,请您配置“keep.xml”文件手动保留layout资源,确保应用正常通过华为应用市场上架审核。
<?xml version="1.0" encoding="utf-8"?> <resources xmlns:tools="http://schemas.android.com/tools" tools:keep="@layout/hms_download_progress,@drawable/screen_off,@layout/upsdk*" tools:shrinkMode="strict" /> -
获取activity
可以用 Common.GetActivity()函数来获取activity。
SDK集成开发
SDK开发
HMS 套件中共包括4个功能服务,在示例项目中都有相应的示例场景。 为了进行测试,您需要通过HMS将其构建到Android移动版上。 确保已创建HMS帐户和项目。 然后,您就可以更改配置并测试不同的功能。

我们需要把 com.android.support:appcompat-v7:28.0.0 加到 launcherTemplate 中
在示例项目中,定位服务对应的场景是: Assets/HuaweiServiceDemo/Scenes/HmsLocationSampleScene.unity
对应的代码是: Assets/HuaweiServiceDemo/demo/test/location/LocationTest.cs.
我们需要设置接收器
-
LocationBroadcastReceiver
-
实现
IBroadcastReceiver接口 -
通过
BroadcastRegister.CreateLocationReceiver方法得到接收器 -
添加以下代码到
AndroidManifest.xml中:<application> ... <receiver android:name="com.unity.hms.location.LocationBroadcastReceiver" android:exported="true"> <intent-filter> <action android:name=`${Your action name}` /> </intent-filter> </receiver> ... </application>android:name是固定的。您可以设置
action android:name的值,但这个值应该与intent.setAction的参数相同。
-
-
GeoFenceReceiver
-
实现
IBroadcastReceiver接口 -
通过
BroadcastRegister.CreateGeoFenceReceiver方法得到接收器 -
添加以下代码到
AndroidManifest.xml中<application> ... <receiver android:name="com.unity.hms.location.GeoFenceBroadcastReceiver" android:exported="true"> <intent-filter> <action android:name=`${Your action name}` /> </intent-filter> </receiver> ... </application>android:name是固定的。您可以设置
action android:name的值,但这个值应该与intent.setAction的参数相同
-
测试与发布
参考华为 HMS Core集成流程 for testing and releasing.

