# 远程配置(AGC)
## 业务介绍
华为AppGallery Connect提供了[远程配置](https://developer.huawei.com/consumer/cn/doc/development/AppGallery-connect-Guides/agc-remoteconfig-introduction)服务,可以在线管理参数。 使用该服务,您可以在线更改应用程序的行为和外观,而无需用户更新应用程序。
通过集成客户端SDK,您的应用程序可以定期获取控制台上传递的参数值,以修改应用程序的行为和外观。
### 主要功能
* 参数管理:包括添加,删除和修改参数,将现有参数复制和修改为新参数,以及设置条件值。
* 条件管理:包括添加,删除和修改条件,以及将现有条件复制和修改为新条件。目前,您可以设置这些条件:版本,语言,国家/地区,受众,用户属性,用户百分比和时间。未来将有更多可用的条件。
* 版本管理:支持对300个历史版本的参数和条件进行多达90天的管理和回滚。
* 权限管理:默认情况下,允许帐户所有者,管理员,应用程序管理员,研发人员和操作人员访问远程配置。
### 典型应用场景
#### 不同地区展现不同语言
使用远程配置的时间条件,设定特定时间触发内容。使用远程配置的国家地区条件和设备语言条件,设定在不同的国家地区分配不同的参数值,从而呈现不同的促销内容。如下图在中国和澳大利亚2个地区,呈现不同的语言。

#### 不同用户展现不同内容
协同高级分析服务,针对不同的用户受众群组推荐不同内容:根据华为分析服务定义的不同用户受众群体,比如对职场白领和学生推送不同的物品及页面布局。

#### 特定主题特定时间配置
更改应用的颜色以配合特定的主题:使用远程配置的时间条件,设定应用不同的颜色、图片素材,配合经常变化的特定主题。比如下图中毕业季这个特殊的时间段,配置一些相关的内容以吸引用户购买。

#### 功能发布
在同一时刻面向所有用户发布新功能的风险很高,利用远程配置可以实现按照百分比发布,从而缓慢向用户发布新功能,可以有效避免舆情或者及时修改调整。
## 华为账号设置
1. 在AppGallery Connect中创建一个应用程序,然后将AppGallery Connect SDK集成到您的应用程序中。有关详细信息,请参阅[AppGallery Connect开发服务使用入门](https://developer.huawei.com/consumer/cn/doc/development/AppGallery-connect-Guides/agc-get-started)。
2. 在项目列表中找到您的项目,然后在项目卡上单击要启用应用程序链接的应用程序。

3. 转到 **增长 > 远程配置**。在远程配置页面上,单击 **立即启用** 。
**注意:**
启用远程配置时,您可能需要设置数据存储位置。然后,`agconnect-services.json`中的设置将相应地自动更新。如果在启用远程配置时设置了数据存储位置,则需要再次下载`agconnect-services.json`文件,并在启用该服务后将其集成到您的项目中。有关详细信息,请参阅[添加配置文件](https://developer.huawei.com/consumer/cn/doc/development/AppGallery-connect-Guides/agc-get-started#addjson)。
4. 配置json文件
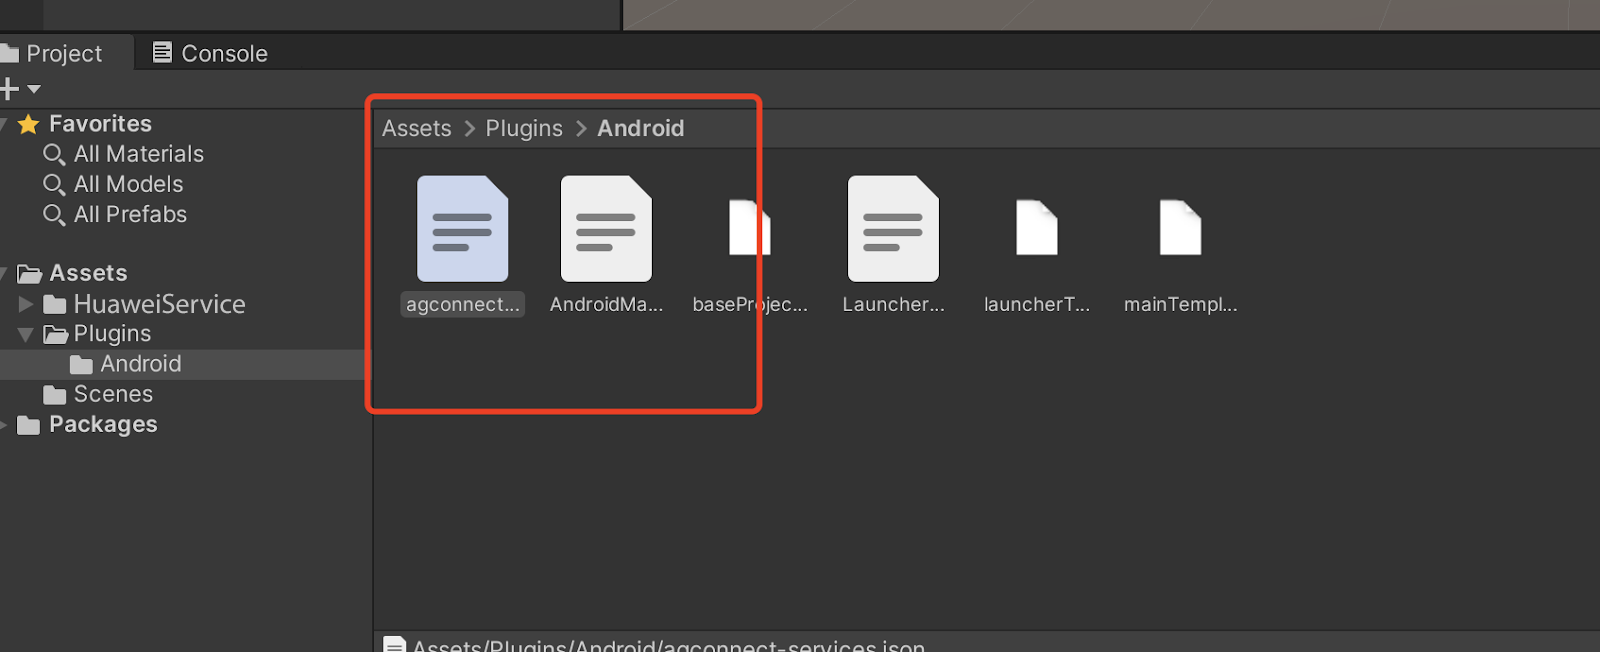
将`agconnect-services.json` 文件复制到`Assets/Plugins/Android`文件夹中。
## Unity项目设置
### 集成远程配置SDK
1. 启用并对project gradle文件添加配置
进入 **Edit -> Project Settings -> Player -> Android(icon) -> Publishing Settings -> Build**
启用 **Custom Base Gradle Template** 并在文件中添加 AppGallery Connect plugin 和 Maven repository。路径是`Assets/Plugins/Android/baseProjectTemplate.gradle`。
如果您的Unity版本低于**2019.2(含)**,则需要在 MainGradleTemplate.gradle 中添加配置。
```
allprojects {
buildscript {
repositories {
...
maven { url 'https://developer.huawei.com/repo/' }
...
}
...
}
...
repositories {
...
maven { url 'https://developer.huawei.com/repo/' }
...
}
}
```
2. 启用并对app gradle文件添加配置
进入 **Edit -> Project Settings -> Player -> Android(icon) -> Publishing Settings -> Build**,启用 **Custom Launcher Gradle Template** 并在 `launcherTemplate.gradle` 中添加依赖。路径为 `Assets/Plugins/Android/LauncherTemplate.gradle`。
如果您的Unity版本低于**2019.2(含)**, 则需要在 MainGradleTemplate.gradle中添加配置。
```
dependencies {
…
implementation 'com.huawei.agconnect:agconnect-remoteconfig:1.4.1.300'
...
}
```
3. 可选:使用XML资源文件
由于Unity无法将xml资源用作Android,因此请将xml资源放在`/Assets/HuaweiService/Android/res/xml/`下。
例如`/Assets/HuaweiService/Android/res/xml/remote_config.xml`。
```
test1
true
111
123.456
FromXml
```
使用帮助功能获取配置ID,并应用xml数据,例如:
```
public void SetXmlValue()
{
var config = AGConnectConfig.getInstance();
int configId = AndroidUtil.GetId(new Context(), "xml", "remote_config");
config.applyDefault(configId);
showAllValues();
}
```
4. 在 **Edit -> Project Settings -> Player -> Android(icon) -> other settings -> Identification -> Package Name** 中设置Package name。
Package Name即为华为项目中应用程序的Package Name。
## SDK集成开发
### 示例: Apply xml 配置
设置场景
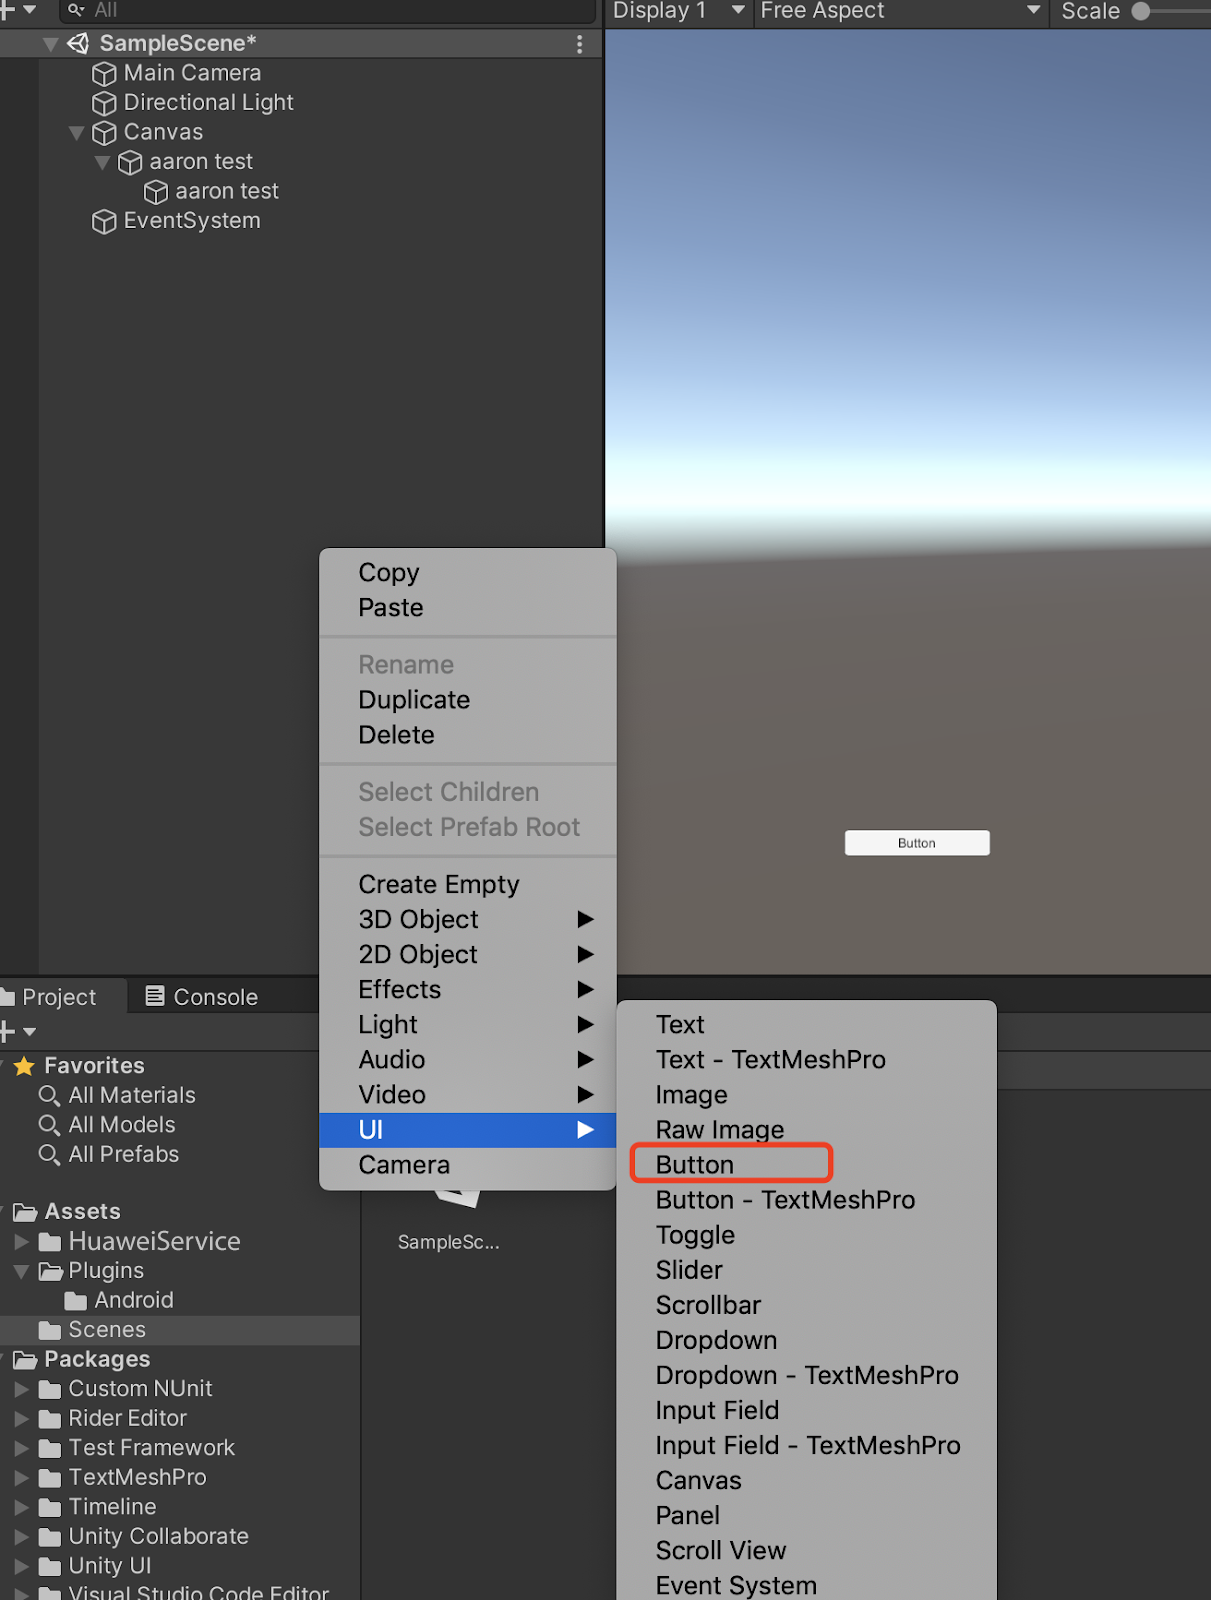
1. 新建一个场景

2. 右键单击并选择UI,然后选择button:
3. 将Component添加到button并开发脚本:


4. 编辑脚本:

双击脚本文件,然后您将在VS code中打开它

5. 定义接口
```
using HuaweiService;
public class
{
public void SetXmlValue()
{
var config = AGConnectConfig.getInstance();
// get res id
int configId = AndroidUtil.GetId(new Context(), "xml", "remote_config");
config.applyDefault(configId);
// get variable
Map map = config.getMergedAll();
var keySet = map.keySet();
var keyArray = keySet.toArray();
foreach (var key in keyArray)
{
var value = config.getSource(key);
// Use the key and value ...
}
}
}
```
创建函数
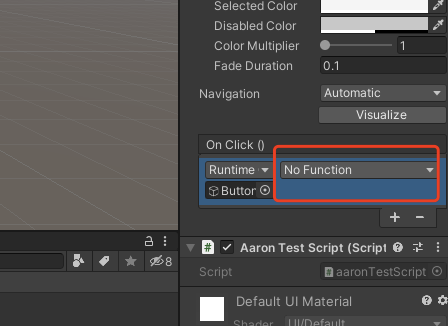
6. 绑定脚本中的按钮和界面

- 步骤1:点击“ +”添加功能
- 步骤2:选择具有您要使用的界面的对应场景
- 步骤3:单击“No Function”以选择脚本,然后选择相应的函数
### 演示项目
如果仍有不清楚的地方,可以查看github上的demo,对应的远程配置用法是:[RemoteConfigTest.cs](https://github.com/Unity-Technologies/HuaweiServiceSample/blob/8a72eb9b34a2d6f1cfe3a8d3340dbf2c6ae1eb4b/Assets/HuaweiServiceDemo/Scripts/test/RemoteConfigTest.cs )